Sometimes, taking a step back to get the big picture is vital to understanding how something works. In most games, tons of theory exists and much of it is abstract and deals with patterns and flow. Why is this so common?
Considering a game from an abstract point of view allows us not only to understand how it works afterwards, it allows us to use that knowledge to anticipate and prepare ourselves for what's to come. Understanding how a game of Warmahordes flows back and forth is about expecting what's to come and setting up for it. How can you win against someone who anticipates your next move?
Some might say that Warmahordes has too many possibilities, there are too many angles for there to be a theory that can explain how a game evolves while also being of actual, in-game use in an arbitrary setting. What I will show here with examples from games I've played is that this is indeed not only possible, but quite apparent once you analyze it. Most games follow a pattern and that pattern can be understood, discussed and used pro-actively in future games. By doing so, you will better understand what to do, and why you do the things you do that work out well.
I've coined this the Ping Pong Theory from its obvious similarities to the game. By and large, Warmahordes is highly destructive and the battle line typically wavers back and forth, much like the ball in a game of ping-pong. By acknowledging this and looking for these patterns you'll understand the situations that occur in your games better and you'll be better equipped to find the best solutions in them.
How can something this abstract be of actual use? Read on!
:: The Ping Pong Theory - Table of Contents ::
I: The Ping Pong Theory Explained
II: The Ping Ping Variation, aka "The Haley Effect"
III: The Ping Pon Variation, aka "The Caine Effect"
IV: What's In This For You?
V: Conclusion
I: The Ping Pong Theory Explained
In a game of chess, getting control of the middle is vital. You often move pieces up that you know you're going to lose because you know you'll be getting an advantageous trade in return. In much the same way, we rush our armies up the table in Warmahordes to get the initiative and dictate the pace of the game. We are looking for openings and making decisions on what to sacrifice, where and when. Most importantly, we are looking for what we can gain from said sacrifice. Sometimes it's obvious, it can be Caine's Boomhowlers running into a zone to buy Caine time to start scoring points. Sometimes it's less obvious, it can be Haley's Thorn running up to a spot where it'll simply cost an opponent so much to remove him that he can't survive the ensuing onslaught from the rest of the army.
In all of the possible cases, understanding the Ping Pong Theory is about thinking ahead. It's about considering what will happen if you do X and realizing what options present themselves. Typically, you send some models up the table. Ping. The ones at the front die and are replaced by your opponent's models. Pong. You kill the ones he has in front in return and so on and so forth.
Let us look at some specific examples. In this first game, my Cygnar army is the "ping" and my momentum is marked by a green line. My opponent's army is the "pong" and his momentum is marked by a red line. The momentum flowing back and forth is essentially what I'm talking about:

Boomies and Alexia advance up hard to provide threat projections.

Retribution responds with Hyperion in a central position, Halbs on one flank and MHSF + SFA on the other.

I jam Boomies up to take out his sacrificial pieces.

The jam is cleared and Hyperion + Halberdiers move up to significantly push the momentum back.

As the game slows down we are reaching a bit of an equilibrium, however my momentum still swings heavily on the right flank as I remove most of the Retribution threats there.
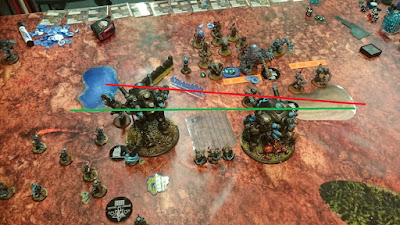
Now, the nature of the pings and pongs depends on what you're trying to accomplish. In this case we are both playing a game of attrition. Scenario casters will often push harder, looking for a more decisive "ping". See for example these couple of turns from a Haley2 game (again with green lines for me, red for my opponent):
I'm moving up the Stormwalls and ATGM, setting up for a hard push and skew T2.

Trolls reply with screening Runeshapers, preventing me from sending up the Stormwalls too far.

Stormwalls go into Runeshapers and ATGM help out on the flank while Haley feats. This feat is in itself is a significant push, something I'll touch on later.

Runeshapers jam in return to push my momentum back: There's no way I can move past them to get at the juicy stuff.
Now, assuming that the players in a game are somewhat skilled and understand how their armies work, I believe this pattern always exists. The nature of the scenarios where everything happens in the middle kind of dictates the whole sacrifice -> kill in return cycle. This game is so incredibly destructive, I've lost a Stormwall on full health during Stryker1's feat turn for example. What this essentially means is that given the right matchup, nothing is impossible to remove. This further cements the ping-pong effect we see above.
We now have a grasp of what this is and some specific examples of what it looks like in-game. Let's take a look at some variations. First up:
II: The Ping Ping Variation, aka "The Haley Effect"
Why do so many people hate playing against Haley2? What exactly does she do that is so annoying? Truth be told I think her strongest part is her spill test combined with her high focus, but what ticks people off is that her feat basically gives you an extra turn. If you set it up properly, an opponent can do next to nothing in return. She sets up a powerful momentum that can't sufficiently be pushed back. Thus, instead of a ping-pong back and forth, she gets a ping-ping. Seems unfair, right? I can understand the frustration, but after all a lot of feats do exactly this. I believe that once you start anticipating it and play accordingly, it gets easier. It's about making the right sacrifices and understanding the ping-pong effect with Haley's ability to get a cycle of ping-ping. Let us first look at how this works in actual games.
First up is a recent game of Haley2 vs Durst. Green lines for my momentum, red for my opponent.
Stormwalls move up and I skew immediately to threaten lots of control on the right flank.

The response is setting the Protectorate forces up for a T2 counter-charge as indicated by the red line.

The problem however is that my opponent hasn't considered what his momentum actually is -if- I feat. The yellow line shows what I perceive it to be (when playing Haley2 I am constantly looking for this: "what will you do if I feat now?").

So I move up and feat and indeed his momentum is further behind than he thought.

I've thus moved my momentum up this turn and my opponent can't really push me back, giving me yet another turn of momentum for the ping-ping effect.
Haley is far from the only caster who can do this, but she is probably the most typical because her effect -always- works. Harbinger can be more devastating against certain armies for example but against others her feat might as well have been non-existant. Control casters like Haley2, Krueger2 and Deneghra1 are the ones who do this the most consistenly but many defensive feats are capable of the same thing. Let's take a look at a Stryker1 game vs Lucant Convergence.
Stormwalls move up centrally to keep his warjacks at bay while the Storm Lances hold the flank vs a potentially powerful push.

Convergence elects to ignore my threats and our momentum lines have moved way past eachother. This is usually a sign that one side has made a mistake, set up a juicy bait or found an opening.

In this particular context the problem for my opponent was that I could wade in on both sides fairly safe from harm in return because of the feat. With taking out his frontline elements there's just not enough punch left to harm +5 ARM models that are already quite tanky.

Indeed the Convergence response fails to break my lines and in fact his momentum is even moved backwards as Lucant needs to be careful.

If you have a caster with a ping-ping potential, looking for such openings will often allow you to catch your opponent off guard, which is exactly what happened in both of these games. Certain feats, spells and abilities allow you to basically just change what your opponent's momentum is. That is hard to counter and hard to see, but if you know what to look for and systematically deduct what happens if A), if B) and so on it'll be easier.
What about the more destructively oriented feats, those that simply remove so much that the counter-punch just doesn't hurt? Caine2 is well known for his ability to simply remove X from the game, which brings us to the next part:
III: The Ping Pon Variation, aka "The Caine Effect"
You set up something that would otherwise invite your opponent to play the ball back to you, but by using your feat (or any other powerful ability) you reduce him so much that what's left to deal damage in return simply won't hit hard enough. Examples here include Issyria, Caine2 and Lylyth2, to name but a few. In my experience these are not known to be as annoying as e.g. Haley2 to play against but they are often just as powerful, if not more so.
Let's look at a couple of games again. First up is Caine2 vs Skarre:
I advance up aggressively and have Caine opposite the Deathjack which is the biggest momentum-piece on the Cryx side.

Cryx shuffle and while his might not at first seem like it changes their momentum it absolutely does because my right flank can easily become overwhelmed.

I believe that by feating and taking out mr DJ I'll deal such a heavy blow to Cryx that the inevitable counter-charge won't have enough strength to truly grant him the momentum he needs.

The counter-attack comes and my next turn will show whether my gamble was right or not.

I clear out everything but a Rider and an Arc Node. With Eiryss2 within 5" of the latter they basically might as well have been dead.

The counter-attack was repelled because I pre-emptively took its teeth out, ensuring that my ping got a "pon" in return instead of a "pong" so to speak. In other words, the alpha strike is so strong that the retaliation isn't powerful enough to regain the momentum.
We have established what the Ping Pong Theory is and we've looked at how casters typically play into a ping-ping or a ping-pon strength. I believe most feats in the game, if not all, are designed to play to these exact patterns.
It's time to take a look at how all of this is actually helpful. While this might make sense and you hopefully agree, we need to explore exactly how we can exploit this knowledge.
IV: What's In This For You?
This part will look at the ways you win games in Warmachine, how those ways are typically played and how you can use the Ping Pong Theory to anticipate and counter your opponent's play.
In Warmahordes there are 3 basic ways to win the game: Attrition, scenario, assassination. Attrition relies on simply having more forces left at any point in time than your opponent can deal with. Cryx often plays this game, absorbing staggering losses and still having enough left to wipe out an opposing army.
Scenario wins typically happen fast. Haley2 loves playing this game, simply denying her opponents a chance at contesting her scenario points.
Lastly, assassination requires aggressive angles and openings on your opposing caster. In my experience Legion and Ravyn players in particular love this game. As a Cygnar player the concept isn't exactly new to me either, between Thorn + Stormwall Haley2, Caine2 on his own and Stryker2 with overload we have a few nasty tricks as well.
Each of these playstyles require a unique approach to the Ping Pong Theory. If attrition is your goal you need to beware of scenario and assassination angles. What you typically want to achieve then, especially if you are up against a scenario/assassination caster, is to hold a straight battle line so that your momentum is evenly spread out. This prevents your opponent from scoring easily and often buys you space on the table. Most of my Caine2 games are like this as my goal at the start of the game is usually to have him play for attrition.
If an assassination angle is your goal you need a spearhead from which to launch your assassination run. A classic example here is Haley2 with Thorn and Stormwall where the jacks run up far ahead of the rest of the army to create a very wide threat radius. Another example is Ravyn's MHSF-units converging towards a caster. Assassination armies will often neglect all other parts of the momentum if they can get this spearhead.
Lastly, scenario armies often, in my experience, go for a skewed battle line. They want their momentum near their scoring core (typically the caster) to be so strong that it simply cannot be pushed back. Haley2 does this extremely well. Krueger2 and The Harbinger of Menoth are also very well suited for this playstyle.
What this tells us is that before you've even deployed, you can start analyzing and figure out what you should do. First of all, you need to correctly determine what your most likely way to win the game is, assuming your opponent doesn't make big mistakes. Is it attrition? If so, deploy and play for an even battleline, ensuring momentum everywhere so you can capitalize on trading pieces in your favour. Is it assassination? Figure out what angles you need, deploy accordingly and make sure your assassination elements get to where they are needed without your opponent being able to simply take them out. Is it scenario? Scoring always starts bottom of T2 so visualize where all elements will be at at this point in time assuming perfect play from both sides. Determine how you can either A) score directly from that point in time, or B) have such a strong position that you are forcing piece-trades that are in your favour.
The nature of what you are trying to do and what your opponent is trying to do thus boils down to variations of these basic formations. Knowing what he'll try to do and how he'll likely go about it gives you an upper hand.
Time for some examples!
In this first game, I was playing Stryker1 vs Vayl2. From experience I know that this is a matchup that Stryker is unlikely to win on attrition and scenario is very hard if Legion plays it right because you typically can't score fast enough before your army is basically torn apart. As such, it was all about putting the pressure on and creating the spearhead for an assassination run (please note that often times this pressure can be used to transition to a scenario game if your opponent withdraws too much). You can read this report here: link
My next example is a game where we both had attrition casters but due to receiving first turn my opponent was able to transition his momentum into pressuring me on scenario. I was playing Caine2 vs Rahn and both of these casters have a very strong attrition game coupled with incredibly nasty assassination angles. While the momentum appears to be skewed here, our caster positions were such that none of us could realistically transition this into a hard push for a scenario victory (the points came gradually for both players). You can see the report here: link
The last game we'll consider here is an interesting encounter between Haley2 and Kreoss3. I'm able to skew the momentum very hard with a feigned move which puts the Protectorate on the spot. Although there are some mistakes by me which makes this a lot harder than it could've been, the essential skew-battleline-for-scenario-win combined with Haley's ping-ping are both easy to spot here (once you know what to look for): Read the report here: link
Considering a game from an abstract point of view allows us not only to understand how it works afterwards, it allows us to use that knowledge to anticipate and prepare ourselves for what's to come. Understanding how a game of Warmahordes flows back and forth is about expecting what's to come and setting up for it. How can you win against someone who anticipates your next move?
Some might say that Warmahordes has too many possibilities, there are too many angles for there to be a theory that can explain how a game evolves while also being of actual, in-game use in an arbitrary setting. What I will show here with examples from games I've played is that this is indeed not only possible, but quite apparent once you analyze it. Most games follow a pattern and that pattern can be understood, discussed and used pro-actively in future games. By doing so, you will better understand what to do, and why you do the things you do that work out well.
I've coined this the Ping Pong Theory from its obvious similarities to the game. By and large, Warmahordes is highly destructive and the battle line typically wavers back and forth, much like the ball in a game of ping-pong. By acknowledging this and looking for these patterns you'll understand the situations that occur in your games better and you'll be better equipped to find the best solutions in them.
How can something this abstract be of actual use? Read on!
:: The Ping Pong Theory - Table of Contents ::
I: The Ping Pong Theory Explained
II: The Ping Ping Variation, aka "The Haley Effect"
III: The Ping Pon Variation, aka "The Caine Effect"
IV: What's In This For You?
V: Conclusion
I: The Ping Pong Theory Explained
In a game of chess, getting control of the middle is vital. You often move pieces up that you know you're going to lose because you know you'll be getting an advantageous trade in return. In much the same way, we rush our armies up the table in Warmahordes to get the initiative and dictate the pace of the game. We are looking for openings and making decisions on what to sacrifice, where and when. Most importantly, we are looking for what we can gain from said sacrifice. Sometimes it's obvious, it can be Caine's Boomhowlers running into a zone to buy Caine time to start scoring points. Sometimes it's less obvious, it can be Haley's Thorn running up to a spot where it'll simply cost an opponent so much to remove him that he can't survive the ensuing onslaught from the rest of the army.
In all of the possible cases, understanding the Ping Pong Theory is about thinking ahead. It's about considering what will happen if you do X and realizing what options present themselves. Typically, you send some models up the table. Ping. The ones at the front die and are replaced by your opponent's models. Pong. You kill the ones he has in front in return and so on and so forth.
Let us look at some specific examples. In this first game, my Cygnar army is the "ping" and my momentum is marked by a green line. My opponent's army is the "pong" and his momentum is marked by a red line. The momentum flowing back and forth is essentially what I'm talking about:

Boomies and Alexia advance up hard to provide threat projections.

Retribution responds with Hyperion in a central position, Halbs on one flank and MHSF + SFA on the other.

I jam Boomies up to take out his sacrificial pieces.

The jam is cleared and Hyperion + Halberdiers move up to significantly push the momentum back.

As the game slows down we are reaching a bit of an equilibrium, however my momentum still swings heavily on the right flank as I remove most of the Retribution threats there.
Now, the nature of the pings and pongs depends on what you're trying to accomplish. In this case we are both playing a game of attrition. Scenario casters will often push harder, looking for a more decisive "ping". See for example these couple of turns from a Haley2 game (again with green lines for me, red for my opponent):
I'm moving up the Stormwalls and ATGM, setting up for a hard push and skew T2.

Trolls reply with screening Runeshapers, preventing me from sending up the Stormwalls too far.

Stormwalls go into Runeshapers and ATGM help out on the flank while Haley feats. This feat is in itself is a significant push, something I'll touch on later.

Runeshapers jam in return to push my momentum back: There's no way I can move past them to get at the juicy stuff.

Now, assuming that the players in a game are somewhat skilled and understand how their armies work, I believe this pattern always exists. The nature of the scenarios where everything happens in the middle kind of dictates the whole sacrifice -> kill in return cycle. This game is so incredibly destructive, I've lost a Stormwall on full health during Stryker1's feat turn for example. What this essentially means is that given the right matchup, nothing is impossible to remove. This further cements the ping-pong effect we see above.
We now have a grasp of what this is and some specific examples of what it looks like in-game. Let's take a look at some variations. First up:
II: The Ping Ping Variation, aka "The Haley Effect"
Why do so many people hate playing against Haley2? What exactly does she do that is so annoying? Truth be told I think her strongest part is her spill test combined with her high focus, but what ticks people off is that her feat basically gives you an extra turn. If you set it up properly, an opponent can do next to nothing in return. She sets up a powerful momentum that can't sufficiently be pushed back. Thus, instead of a ping-pong back and forth, she gets a ping-ping. Seems unfair, right? I can understand the frustration, but after all a lot of feats do exactly this. I believe that once you start anticipating it and play accordingly, it gets easier. It's about making the right sacrifices and understanding the ping-pong effect with Haley's ability to get a cycle of ping-ping. Let us first look at how this works in actual games.
First up is a recent game of Haley2 vs Durst. Green lines for my momentum, red for my opponent.
Stormwalls move up and I skew immediately to threaten lots of control on the right flank.

The response is setting the Protectorate forces up for a T2 counter-charge as indicated by the red line.

The problem however is that my opponent hasn't considered what his momentum actually is -if- I feat. The yellow line shows what I perceive it to be (when playing Haley2 I am constantly looking for this: "what will you do if I feat now?").

So I move up and feat and indeed his momentum is further behind than he thought.

I've thus moved my momentum up this turn and my opponent can't really push me back, giving me yet another turn of momentum for the ping-ping effect.
Haley is far from the only caster who can do this, but she is probably the most typical because her effect -always- works. Harbinger can be more devastating against certain armies for example but against others her feat might as well have been non-existant. Control casters like Haley2, Krueger2 and Deneghra1 are the ones who do this the most consistenly but many defensive feats are capable of the same thing. Let's take a look at a Stryker1 game vs Lucant Convergence.
Stormwalls move up centrally to keep his warjacks at bay while the Storm Lances hold the flank vs a potentially powerful push.

Convergence elects to ignore my threats and our momentum lines have moved way past eachother. This is usually a sign that one side has made a mistake, set up a juicy bait or found an opening.

In this particular context the problem for my opponent was that I could wade in on both sides fairly safe from harm in return because of the feat. With taking out his frontline elements there's just not enough punch left to harm +5 ARM models that are already quite tanky.

Indeed the Convergence response fails to break my lines and in fact his momentum is even moved backwards as Lucant needs to be careful.

What about the more destructively oriented feats, those that simply remove so much that the counter-punch just doesn't hurt? Caine2 is well known for his ability to simply remove X from the game, which brings us to the next part:
III: The Ping Pon Variation, aka "The Caine Effect"
You set up something that would otherwise invite your opponent to play the ball back to you, but by using your feat (or any other powerful ability) you reduce him so much that what's left to deal damage in return simply won't hit hard enough. Examples here include Issyria, Caine2 and Lylyth2, to name but a few. In my experience these are not known to be as annoying as e.g. Haley2 to play against but they are often just as powerful, if not more so.
Let's look at a couple of games again. First up is Caine2 vs Skarre:
I advance up aggressively and have Caine opposite the Deathjack which is the biggest momentum-piece on the Cryx side.

Cryx shuffle and while his might not at first seem like it changes their momentum it absolutely does because my right flank can easily become overwhelmed.

I believe that by feating and taking out mr DJ I'll deal such a heavy blow to Cryx that the inevitable counter-charge won't have enough strength to truly grant him the momentum he needs.

The counter-attack comes and my next turn will show whether my gamble was right or not.

I clear out everything but a Rider and an Arc Node. With Eiryss2 within 5" of the latter they basically might as well have been dead.

The counter-attack was repelled because I pre-emptively took its teeth out, ensuring that my ping got a "pon" in return instead of a "pong" so to speak. In other words, the alpha strike is so strong that the retaliation isn't powerful enough to regain the momentum.
We have established what the Ping Pong Theory is and we've looked at how casters typically play into a ping-ping or a ping-pon strength. I believe most feats in the game, if not all, are designed to play to these exact patterns.
It's time to take a look at how all of this is actually helpful. While this might make sense and you hopefully agree, we need to explore exactly how we can exploit this knowledge.
IV: What's In This For You?
This part will look at the ways you win games in Warmachine, how those ways are typically played and how you can use the Ping Pong Theory to anticipate and counter your opponent's play.
In Warmahordes there are 3 basic ways to win the game: Attrition, scenario, assassination. Attrition relies on simply having more forces left at any point in time than your opponent can deal with. Cryx often plays this game, absorbing staggering losses and still having enough left to wipe out an opposing army.
Scenario wins typically happen fast. Haley2 loves playing this game, simply denying her opponents a chance at contesting her scenario points.
Lastly, assassination requires aggressive angles and openings on your opposing caster. In my experience Legion and Ravyn players in particular love this game. As a Cygnar player the concept isn't exactly new to me either, between Thorn + Stormwall Haley2, Caine2 on his own and Stryker2 with overload we have a few nasty tricks as well.
 |
| A classic Caine2 game vs Cryx where Caine simply wins by attrition. |
Each of these playstyles require a unique approach to the Ping Pong Theory. If attrition is your goal you need to beware of scenario and assassination angles. What you typically want to achieve then, especially if you are up against a scenario/assassination caster, is to hold a straight battle line so that your momentum is evenly spread out. This prevents your opponent from scoring easily and often buys you space on the table. Most of my Caine2 games are like this as my goal at the start of the game is usually to have him play for attrition.
If an assassination angle is your goal you need a spearhead from which to launch your assassination run. A classic example here is Haley2 with Thorn and Stormwall where the jacks run up far ahead of the rest of the army to create a very wide threat radius. Another example is Ravyn's MHSF-units converging towards a caster. Assassination armies will often neglect all other parts of the momentum if they can get this spearhead.
Lastly, scenario armies often, in my experience, go for a skewed battle line. They want their momentum near their scoring core (typically the caster) to be so strong that it simply cannot be pushed back. Haley2 does this extremely well. Krueger2 and The Harbinger of Menoth are also very well suited for this playstyle.
 |
| Haley2 with a skewed battleline against Trolls, trying to win on scenario in Fire Support. |
What this tells us is that before you've even deployed, you can start analyzing and figure out what you should do. First of all, you need to correctly determine what your most likely way to win the game is, assuming your opponent doesn't make big mistakes. Is it attrition? If so, deploy and play for an even battleline, ensuring momentum everywhere so you can capitalize on trading pieces in your favour. Is it assassination? Figure out what angles you need, deploy accordingly and make sure your assassination elements get to where they are needed without your opponent being able to simply take them out. Is it scenario? Scoring always starts bottom of T2 so visualize where all elements will be at at this point in time assuming perfect play from both sides. Determine how you can either A) score directly from that point in time, or B) have such a strong position that you are forcing piece-trades that are in your favour.
The nature of what you are trying to do and what your opponent is trying to do thus boils down to variations of these basic formations. Knowing what he'll try to do and how he'll likely go about it gives you an upper hand.
Time for some examples!
In this first game, I was playing Stryker1 vs Vayl2. From experience I know that this is a matchup that Stryker is unlikely to win on attrition and scenario is very hard if Legion plays it right because you typically can't score fast enough before your army is basically torn apart. As such, it was all about putting the pressure on and creating the spearhead for an assassination run (please note that often times this pressure can be used to transition to a scenario game if your opponent withdraws too much). You can read this report here: link
My next example is a game where we both had attrition casters but due to receiving first turn my opponent was able to transition his momentum into pressuring me on scenario. I was playing Caine2 vs Rahn and both of these casters have a very strong attrition game coupled with incredibly nasty assassination angles. While the momentum appears to be skewed here, our caster positions were such that none of us could realistically transition this into a hard push for a scenario victory (the points came gradually for both players). You can see the report here: link
The last game we'll consider here is an interesting encounter between Haley2 and Kreoss3. I'm able to skew the momentum very hard with a feigned move which puts the Protectorate on the spot. Although there are some mistakes by me which makes this a lot harder than it could've been, the essential skew-battleline-for-scenario-win combined with Haley's ping-ping are both easy to spot here (once you know what to look for): Read the report here: link
What happens if you miscalculate how you can win? In my experience, you lose hard. The first thing you have to do is have a plan for how you'll win. The second thing you have to do is to validate that this plan can actually work. Without prior experience with at least your own list (and preferably your opponent's) you will likely make some poor calculations in this matter. I had a game only yesterday where I made a wrong assumption: I thought I could attrition faster than I could so I give my opponent too much space. As it was made painfully clear to me that my attrition rate wasn't what I had hoped for I had no way to contest him scoring points and taking the game on scenario. What I should've done instead was to play hard and fast, pressuring assassination angles and threatening with a scenario win on my own (his right flank from my point of view was weak-ish). This was a game between Kraye and Jarl, you can read about it here: link
V: Conclusion
The take-aways from analyzing the game with the Ping Pong Theory are applicable on many levels. Take list writing for example. Is your caster a ping-ping caster like Haley2 or Harbinger? How do you maximise that potential? What matchups does said ping-ping effect work poorly against? How can you design your list to help you with that? To answer this with my own train of thought behind the NM2016-Haley2 list, the idea was to have her be scenario focused. A problem would be armies swarming me and contesting zones as well as durable troops sucking up Haley's amazing feat turn and still come back to hurt me. The double Stormwall approach let her deal with what my other caster, Caine2, couldn't handle too well, while also maximising her own game (I played 4 games with Haley2. 1 was won by my opponent clocking out, 1 was won by assassionation and 2 were won on scenario) which is scenario. Indeed, the one assassination win she got came from pressuring the scenario angle. Note that while I haven't found ATGM to be the best choice alongside double Stormwall in general, they work very well with Haley2 because they amplify her scenario strength.
 |
| Notice how all elements are positioned to affect the game like I want them to in my T2: Boomies to negate Storm Lances, Alexia and Acosta to take the middle, ATGM to force him away from my strong flank with Thunderbolts and TAC to cloud up for Caine centrally to maintain his assassination angle. All these choices were selected over time based on playtesting to enhance Caine's ability to play with a straight battleline. |
What about when the game is about to start? By correctly identifying both your best approach and your opponent's best approach you can predict his deployment and deploy accordingly. I find that most lists I play have certain deployment patterns they tend to fall back on. This is precisely because of this: Assassination lists need a spearhead, attrition needs a straight line and scenario needs a skew. Hence my Boomies typically go opposite my opponent's strong flank, Haley2's gun mages typically go on my strong flank etc. Likewise, when I see for example Zealots in my opponent's list I anticipate them coming towards my strong flank and can thus prepare for it, even if I deploy first.
 |
| Haley2 vs Vayl2. I know Vayl's best angle here is assassination. She is thus looking for a spearhead. Due to the dynamics of Haley's feat coupled with double Stormwalls, it is my experience that this spearhead has to come from one of my flanks. Thus, ATGM, who often run on my strong flank, instead take the middle to disrupt Vayl's spearhead. Indeed the Legion beasts dropped center and the position of the ATGM was crucial middle-game. |
In-game there are many ways you can use the Ping Pong Theory to predict what'll happen in the next few turns. I find that one of the easiest ways to use it is to look straight at the "big picture". I.e. don't look at dice and odds but just try and get a feel of where the momentum will be. I frequently discuss games with my opponents when we're done, at which point we often shuffle models around to basically re-play "big picture alternatives" in just a couple of minutes to visualize the possible angles. Visualizing your own momentum a full turn ahead is hard to learn, visualizing your opponent's momentum a full turn ahead is exponentially harder.
 |
| Haley2 vs Doomie3. His best option is to win on attrition. my best option is to win on attrition. He has formed his straight battleline and I have to respond with my own. I anticipate his next turn being an equal push from all beasts. Since I can't take a face-to-face confrontation, I need to break him up and deal with one at a time. In my next turn around I anticipate sending in a Stormwall under the cover of feat unless he feats, in which case I'll chill another turn. Doomie is in no position to win on scenario from where he stands so this game, for me, is all about keeping a straight battleline to avoid assassination angles/isolation while keeping my cool to let the big guns take their toll before engaging. |
Another great way of using the Ping Pong Theory is to actively look for opportunities (and predict them!) to force a "Ping Pon" outside of feat turn. Utility solos, shenanigans and jamming units are all great for this. By forcing an opponent to remove something that is stupidly hard to remove, you are gaining momentum and reducing the pressure on the rest of your units. Let's look at 2 game-breaking examples in quick succession:
Caine2 vs Rahn. Rahn moves first, I'm not scared of a scenario angle so I choose to make the "straight battleline" angled. This preserves Boomies. However, I fail to take into account how far Skeryth can get with all of Rahn's shenanigans...

So while the Retribution forces advance, Skeryth charges into Ace and jams him up. I have Effigy of Valor so his DEF is stupidly good. Given his position I can't -not- remove him, but doing so requires all of Caine's efforts and then some.

This game eventually boiled down to a crazy case of attrition where there were less than 10 models combined on the table. I believe this was the game-breaking moment because Caine's inability to put his hurt effectively onto the rest of the table trickles down in the future turns.
Caine2 vs Haley3. In my first turn I sent Alexia up high in the middle to ensure she'd have tons of angles T2. When Haley indeed sent her forces up in the "safety" of a cloud wall in return I simply jammed her home. I put up Arcane Shield on her and proceeded to have Lynch light her up. Ryan then Mage Storm'd her to take out a couple of models around her before Caine put up magic bullets on ATGM which cleared an even bigger hole around her. Now, in a cloud from mage storm with 3 souls, arcane vortex, arcane shield and a POW12 around her, she's incredibly hard to take down for Haley3, Tempest Blazers and Stormblades. The latter can't get into melee range, her defense is pretty strong even against Temporal Flux and she can remove spells. However what are you going to do? You can't let her live in the middle of your army with 3 souls either, exactly.

The solution was that every single model in the middle and on the right flank went for her and indeed killed her, but nothing else in my entire army was hurt so the returning onslaught was completely game-breaking.
To summarize, we've looked at the Ping Pong Theory, which basically says that momentum waves back and forth. The nature of said momentum depends on the strategy you are employing to win:
- Assassination strategies require spearhead momentum
- Attrition strategies require a straight battle line momentum
- Scenario strategies require a skewed momentum
Furthermore, these momentums are affected by feats, abilities and opportunities that allow you to press on as if you had 2 turns, also known as the Ping Ping Effect, or prevent your opponent from decisively hitting you back, also known as the Ping Pon Effect.
The Ping Pong Theory can be used in list creation to ensure that you have the elements you need and help you better evaluate matchups by understanding the nature of how X works vs Y based on momentum. It can be used prior to deployment by analyzing how you and your opponent will likely go about trying to win the game and anticipating his drops and early moves. It can also be used in-game to predict what the momentum will look like in the future and thus, plan ahead.
While Warmahordes is never straight-forward, I find that having this framework helps me simplify and plan my games. The complexity in Warmahordes is staggering and the time constraints brought by the deathclock means you cannot evaluate all angles and possibilities. By reducing the complexity we can look for patterns and exploit the situations that appear. The Ping Pong Theory is my way to explain how I perceive the game from a big picture point of view. I hope I've managed to convey what it's all about and how it's useful. Hopefully, with a little practice, you'll be able to pull off moves like this:

Ingen kommentarer:
Legg inn en kommentar