søndag 31. juli 2016

Indian Summer Game 6 (#243): Haley2 vs Durst

:: Prologue ::

My very last game of Indian Summer 2016 was a flash-back to Norwegian Masters back in January this year: Following an extremely hard game 5 (which I lost in both tournaments), I get Durst in a very favourable scenario for Haley2 for my last game. While I wanted to drop Caine2 just to get the practice, there was no way I was giving up this because it's just too much fun to play Haley2 into Protectorate. I know, I should've played Caine.

:: Lists ::

Cygnar:
(Haley 2) Major Victoria Haley [+25]
- Thorn [13]
- Stormwall [39]
- Squire [5]
- Ironclad [12]
Journeyman Warcaster [4]
- Firefly [8]
Captain Arlan Strangewayes [4]
Lanyssa Ryssyl, Nyss Sorceress [3]
Storm Lances (min) [12]
Opponent:
Anson Durst, Rock of the Faith - WJ: +28
-    Reckoner - PC: 16 (Battlegroup Points Used: 16)
-    Reckoner - PC: 16 (Battlegroup Points Used: 12)
-    Fire of Salvation - PC: 16
-    Crusader - PC: 10
-    Redeemer - PC: 11
Pyrrhus, Flameguard Hero - PC: 5
Nicia, Tear of Vengeance - PC: 5
Allegiant of the Order of the Fist - PC: 3
Vassal of Menoth - PC: 3
Choir of Menoth - Leader & 3 Grunts: 4
Temple Flameguard - Leader & 9 Grunts: 11

:: Pre-Battle Thoughts & Deployment ::

Entrenched and I go first. I deploy for a scenario play and intend to just refuse him any and all access to my zone. If he wants to fight me head on I intend to use shenanigans because Haley2. My opponent deploys extremely defensively with just Monks, TFG and Pyrrhus posed to threaten my zone.


:: Game ::

I run stuff up. Ironclad and Thorn are outside of 21" of the Redeemer.


Protectorate runs! Redeemer tries to hit the Stormwall I believe but no harm is done.


Ironclad charges a TFG and uses Tremor to knock down 3 + Pyrrhus. Stormwall shoots down a ton of KD models, including Pyrrhus, and pods next to the Monks. Firefly with TA and Storm Lances clear out the monks and more TFGs. Haley2 chills. Lanyssa brainfart as I completely forget about Nicia on my left flank (the round piece of terrain is a proxy trench).


My opponent brainfarts and charges Lances with remaining TFG instead of contesting me. Nicia misses Lanyssa on both attacks. Durst feats. 1-1.


It's feat time! I kill the TFG and send the Ironclad into the Redeemer and the Stormwall into one of the heavies. Lances, Firefly and Thorn all set up. 2-1.


Not much to do under Shift. 3-1.


I destroy his objective. 5-1.


Victory to the Swans!

:: Evaluation ::

I find Durst to be one of the worst casters against Haley2 because he has no ranged threat projection and way too little shenanigans to get work done when faced with Temporal Acceleration, Hunter's Mark, TK, Time Bomb, Shift and what not. When I get a scenario like this on top of that it's a very hard uphill battle for him.

It is possible that he can go for a hyper-aggressive move by deploying behind my zone, but he is so slow that I don't see how he can transition this into a scenario threat before I can turn the tables around and go for his zone instead.

After a great set of games, some against inexperienced opponents and some against really strong ones, I managed to take 2nd place. In my opinion Wurmwood is probably around 50/50 into Haley2 so considering my opponent played better than me here I'm happy with that result. I have a lot of ideas for lists, tactics, pairings and competitive musings which I intend to post my thoughts on so stay tuned!

Indian Summer Game 5 (#242): Haley2 vs Wurmwood

:: Prologue ::

First game of day two was against Wurmwood. All I was hoping for here was to either go first, or get a scenario which would force him into a predictable position with Wurmwood so that the Stormwall would get a bit of space.

:: Lists ::

Cygnar:
(Haley 2) Major Victoria Haley [+25]
- Thorn [13]
- Stormwall [39]
- Squire [5]
- Ironclad [12]
Journeyman Warcaster [4]
- Firefly [8]
Captain Arlan Strangewayes [4]
Lanyssa Ryssyl, Nyss Sorceress [3]
Storm Lances (min) [12]
Opponent:
Wurmwood, Tree of Fate & Cassius the Oathkeeper - WB: +27
-    Wurmwood, Tree of Fate & Cassius the Oathkeeper (Cont.)
-    Feral Warpwolf - PC: 18 (Battlegroup Points Used: 18)
-    Megalith - PC: 20 (Battlegroup Points Used: 9)
-    Pureblood Warpwolf - PC: 17
Gallows Grove - PC: 2
Lanyssa Ryssyl, Nyss Sorceress - PC: 3
War Wolf - PC: 2
War Wolf - PC: 2
Reeves of Orboros - Leader & 9 Grunts: 16
-    Reeve of Orboros Chieftain & Standard - Chieftain & Standard: 4
Sentry Stone & Mannikins - Leader & 3 Grunts: 5
Shifting Stones - Leader & 2 Grunts: 3
Farrow Bone Grinders - Leader & 3 Grunts: 5

:: Pre-Battle Thoughts & Deployment ::

I lose the roll-off and move second and we are playing the Pit. Christ. I put the Stormwall on my "strong" flank, hoping to be able to perhaps force a scenario move or something or at least skew him away from Wurmwood if he wanted to go for his own scenario play.


:: Game ::

Stuff runs up. Sentry stones weren't pre-measured and their forest spawns didn't overlap. I did point this out to my opponent before he activated Wurmwood so he put down a woods in front of them.


I saw 2 options here: Try and flank with the Stormwall and hope for an opening or go for Cassius. The Cassius angle is as follows: Run Thorn, arcane bolt the Mannikin in the way, reaction drive Thorn, TK Thorn into the Wurmie woods, TK Cassius out, shoot Cassius with Stormwall having TA. Needing TA was a real pain as Haley had no focus left. I figured balls to the wall and what-not and went for the play. Unfortunately I was unable to get the Feral in the feat without being inside of 18" of Wurmwood (I really didn't want this as his Stones could've ported him and he could've Strangleholded me but this was a mistake anyway because Craft Talisman gives him a 20" threat range, not 18"). At least Cassius died.


Feral charges Thorn and at this point in time I'm just hoping for a miss. If Thorn goes down I'm in trouble. The miss does come, but at the very last attack and Thorn is left on 5 or 6 boxes, cortex and arc node both gone. Wurmwood tries to finish him off before he is ported to his own objective but he fails. It doesn't matter though, at a single box Thorn won't be doing much. Wurmie feats.


The flanking Stormwall move is showing its limitations. I can't get it into the thick of things quickly enough to capitalize on it. I realize how badly the gambit was to begin with (even if successful, which by all means it was) but that's too late now. I spend about forever trying to figure out just what on Earth I can do. I respect the Gallow's Grove way too much because I don't realize it's too far away from Wurmwood for him to channel through it. My first idea was to get the Stormwall into the wolf solo on the left by charging it to get it far up. This also creates a multi-angle threat on Wurmwood and forces his heavies to commit somewhat. I don't go for that move because of the Grove, so instead I try and shoot shit up. That also would've gotten me my opponent's Lanyssa. I move my own Lanyssa + Junior behind the house alongside the Firefly. Not being able to contest him or even score myself really hurts here and says a lot about the state of the game.


A really clever play by Circle sees his entire army pulling back and just consolidating its position. 0-3.


At this point in time it's down to dice and I just hope I can get some work done. The Stormwall and the Ironclad charge a Sentry Stone each and kill them. A Lance moves in the zone. I don't however put the Firefly in the zone. Mistake. 'Wall pops Lanyssa and contests with a pod.


Circle's plan is to shoot the Lance with Reeves and throw out the Ironclad with the Pureblood, followed up by Megalith and Feral hammering the Stormwall. The Lances dies and the Ironclad is thrown out. The remaining heavies both get Wraithbane and Wurmwood puts up Curse of Shadows on the Stormwall. He rolls pretty bad, close to crap I'd say, and it all comes down to a single hit needing a 9+ unboosted to kill off the wall and thus win the game (anything else is more or less an auto-loss as Wurmwood stands in the open at 1 fury and 0 souls). He makes the roll and wins the game.

10 minutes later or something however I remember that he was rolling at dice minus 2, which isn't correct: He forgot the bonus from Curse of Shadows which essentially meant that it actually wasn't even remotely close.

:: Evaluation ::

Although the gambit was a success, it was a bad trade. Thorn is more important for me than Cassius is for him, basically, at least when the feat is like this. Furthermore if I'd have gotten all Wolves in the feat he could likely have killed Thorn regardless with Hellmouth setup by Mannikins.

I hate going second vs the Wurmwood as my angles get so insanely gimped. This was no exception but I think the flanking play is a mistake. I have to the Stormwall into action somehow. The Ironclad is probably a better flanker together with Thorn. Megalith does provide an additional Stranglehold though which is really strong against both of these as it's fairly likely to damage ARM18 when boosted.

The lack of terrain in this game was a big deal. No-where to reliably hide or use for DEF-bonus/Hellmouth prevention. Neither the Feral nor the Pureblood have Pathfinder so that would be a biggie for sure. In any case my opponent played a better game here and won deservedly.


Indian Summer Game 4 (#241): Haley2 vs Haley2

:: Prologue ::

A friend of mine who plays Cygnar only started playing miniature games in February this year. We spar a lot and he's taken a liking to some of my ideas. So much in fact that his Haley2 list is a carbon copy of mine. What possibly looks like the most boring mirror in the world on paper turned out to be a very exciting and close game in practice. Haley2 vs Haley2, let the best time controller win!

:: Lists ::

Cygnar:
(Haley 2) Major Victoria Haley [+25]
- Thorn [13]
- Stormwall [39]
- Squire [5]
- Ironclad [12]
Journeyman Warcaster [4]
- Firefly [8]
Captain Arlan Strangewayes [4]
Lanyssa Ryssyl, Nyss Sorceress [3]
Storm Lances (min) [12]
Opponent:
(Haley 2) Major Victoria Haley [+25]
- Thorn [13]
- Stormwall [39]
- Squire [5]
- Ironclad [12]
Journeyman Warcaster [4]
- Firefly [8]
Captain Arlan Strangewayes [4]
Lanyssa Ryssyl, Nyss Sorceress [3]
Storm Lances (min) [12]

:: Pre-Battle Thoughts & Deployment ::

The scenario was Incursion and I lost the roll-off and had to move second. Again a very open map, however one side had a hill, a Trench and a wall close to the right flag. The other side also had 2 pieces of rough and I know how much my list hates this so the choice was easy. The idea was to look for an opening on one of the flanks depending on his turn 1 move and hopefully get control of the Lances and/or Thorn as quickly as possible.


:: Game ::

My opponent runs up. Thorn on the left with Lances, Ironclad + Firefly on the right, Stormwall centrally.


My idea this turn is centered on trying to take out Thorn's Arc Node. He is within 21" of my Stormwall. I contemplate running my own Thorn to try and dominate his but I can't get meaningful work done out of it. I make a mistake though as I move up to shoot Thorn with Temporal Acceleration: I place the Stormwall within 12" of him so that he can't move out of range with a single dodge, unfortunately this means being within 18" of Lanyssa... The third shot misses and I have done no significant damage, unfortunately.


The opening is real and my opponent goes for it. My Stormwall gets reduced to a little less than half a side and "evil" Haley feats. She makes sure to just catch Arlan to prevent repairs.


With "evil" Haley camping 1 focus, I contemplate assassination. However there is nothing but spells around and the 8+ to hit her is dicey, even with future sight and squire. POW11 isn't that much. An alternative is Time Bomb but it still feels iffy without a follow up. I put it aside and decide that there are 2 other possibilities. One is going for Junior. This is possible with TK + Reaction Drive on Thorn I believe. The other is getting his Squire so that Arlan can move up and repair. I could just TK Arlan but taking out his squire is so much better. I go for the Squire move and feat. TA is up on the Stormwall and I roll pretty well, doing roughly as much damage as he did (that is minus one charge attack, basically). Storm Lances crippled Thorn's Arc Node and helped out a bit vs Stormwall.

Now I just have to hope my Stormwall lives through the turn.


A huge mistake I made which I didn't see before it was too late was that my non-charging Lance (i.e. the one caught in "evil" Haley's feat) is an absolutely amazing throw piece onto my Haley. I had 0 focus, reasoning that "evil" Haley can't reliably kill me without a Squire, but a throw changes all of this, obviously. Luckily my opponent didn't see the angle and went for the Stormwall instead.

Then dice happened. He did have a crippled arm and he did not have Temporal, but that's still 4 attacks and he ended up doing... 6 boxes!


I breath a sigh of relief. I manage to take out his Stormwall now and start scoring. With the Stormwall out of the picture it's basically game over and my opponent concedes.

Victory to the Swans!

:: Evaluation ::

The reasoning behind being 12" away from Thorn and thus not care too much about Dodge is sound enough in itself, but when this means being 18" away from Lanyssa as well it's just way too risky. He needs a 5+ to hit me under Deflection and that usually goes well. This sets up the entire game and my opponent gets a huge lead, which he then fails to capitalize on from not seeing the throw-assassination and then rolling dice which it's been a long time since I saw the likes of.

This matchup is very much about Thorn. The fact that he can be dominated is huge and if you can somehow capitalize on that, it's very, very hard for an opponent to get back. I played my Ironclad pretty bad, same for Lanyssa (which died to his Firefly shooting his Ironclad in the back top of 2), as these were needed in a closer spot. Having to keep Haley outside of 4" of the Stormwall because of eleaps (literally all my other models there bar the Squire were electro-immune) was a real pain when I feated for example and there was no more power to throw into the "evil" Stormwall.

Overall a great game from my opponent but dice saved me. Not much one can do about that.

EDIT: My opponent writes a blog as well and his report from this game is now posted. You can read it here: PlayTestedForYears - Haley2 vs Haley2

Indian Summer Game 3 (#240): Caine2 vs Absylonia2

:: Prologue ::

For my third game I drew Legion. I usually say that in every tournament, you run into Legion sooner or later. Despite the nerfs I still think Legion is a naturally strong faction vs Cygnar and although Sloan can shoot most Legion armies to death like it ain't no thing, I didn't have Sloan. On the bright side it was time for Caine2 to step up and thus ensure I wouldn't be stressed out about being list-locked!

:: Lists ::

Cygnar:
(Caine 2) Captain Allister Caine [+27]
- Stormwall [39]
- Reinholdt, Gobber Speculator [4]
Captain Arlan Strangewayes [4]
Journeyman Warcaster [4]
- Firefly [8]
Rangers [9]
Storm Lances (min) [12]
Gobber Tinker [2]
Ragman [4]
Rhupert Carvolo, Piper of Ord [4]
Opponent:
Absylonia, Daughter of Everblight - WB: +28
-    Angelius - PC: 17 (Battlegroup Points Used: 17)
-    Seraph - PC: 14 (Battlegroup Points Used: 11)
-    Proteus - PC: 19
-    Raek - PC: 8
-    Raek - PC: 8
-    Blight Wasps - PC: 8
Strider Deathstalker - PC: 4
The Forsaken - PC: 4
Spell Martyr - PC: 1
Blighted Nyss Shepherd - PC: 1
Blackfrost Shard - Sevryn, Rhylyss & Vysarr: 9
:: Pre-Battle Thoughts & Deployment ::

The scenario is Take and Hold and the terrain is pretty flat. Little to hide behind. I have a forest on my left side where I can stay to the right of without killboxing myself. The idea is to move the Stormwall there and form "fort Caine". Unfortunately I lose the roll-off and Legion moves first. However, like my last opponent, the guy I'm playing against has not played vs Cygnar before. I take care to go through everything I have, emphasizing just how hard Caine shoots. Anyway, I deploy so that my "fort Caine" plan is hopefully not revealed.


:: Game ::

Legion runs up but he is very cautious. I have no-where near the threat ranges he is respecting (Rangers' threat of 17" being what he's worried about). Bracer up on Proteus.


I have too little experience with Caine2 vs Legion and have never played vs Absylonia2 before. I am possibly a little too conservative here but I think that time is on my side because he doesn't have a whole lot of shooting and the next turn I will get a lot of angles. I decide to keep Caine in the open but outside of melee threat ranges. With Bullet Dodger I really should be fine. Also I need to ensure that "fort Caine" isn't compromised too early.


Absylonia makes a very aggressive move: She sends up Proteus and parks herself behind him in b2b. However she is within 10" of the Stormwall.


The idea is simple enough: Charge Absylonia with Stormwall, boost attack roll on charge attack with Arlan's focus. Move Ragman, Death Field, Feat, kill. She had but 3 transfers and I could get a Ranger in.


With that much power, the blighted warlock went down.

Victory to the Swans!

:: Evaluation ::

My opponent's inexperience with Cygnar in general and Caine2 in particular ended this game abruptly. I might have had an issue on my hands if he had instead decided to get some decent threat ranges on the Stormwall and camped more on Absylonia. On the other hand it's an extremely open map and hard to get much work done and it's unnerving being shot apart without being able to do much in return.

I really missed Lanyssa here as my theoretical threat ranges were so significantly much smaller than his. Being able to pump Lances to 15" and Stormwall to 12" probably would've given me more respect here. The matchup looks really interesting though and I think it's an exciting game if both players know it better.

Indian Summer Game 2 (#239): Haley2 vs Kreoss1

:: Prologue ::

For my second game I met a really nice player who unfortunately had never met Cygnar before. I won't lie, playing Protectorate and not having faced Haley2, let alone Cygnar, is one of the harder things in this game.

:: Lists ::

Cygnar:
(Haley 2) Major Victoria Haley [+25]
- Thorn [13]
- Stormwall [39]
- Squire [5]
- Ironclad [12]
Journeyman Warcaster [4]
- Firefly [8]
Captain Arlan Strangewayes [4]
Lanyssa Ryssyl, Nyss Sorceress [3]
Storm Lances (min) [12]
Opponent:
High Exemplar Kreoss - WJ: +29
-    Crusader - PC: 10 (Battlegroup Points Used: 10)
-    Reckoner - PC: 16 (Battlegroup Points Used: 16)
-    Templar - PC: 15 (Battlegroup Points Used: 3)
-    Vanquisher - PC: 17
Exemplar Errant Seneschal - PC: 4
High Paladin Dartan Vilmon - PC: 6
Paladin of the Order of the Wall - PC: 4
Vassal of Menoth - PC: 3
Choir of Menoth - Leader & 5 Grunts: 6
Exemplar Errants - Leader & 9 Grunts: 16

:: Pre-Battle Thoughts & Deployment ::

The scenario was Extraction and I got first turn. There was a forest piece in the middle of the table and I knew that would be huge here. On top of that I could hide Haley away with a cloud should I want to because he had no tech to see through it. I positioned the Stormwall on one flank and Lances on the other.


:: Game ::

I run stuff up. Thorn runs really far to get the most angles. I brainfart with the Lances as I don't leave room for the Firefly to move through them.


Everything advances and Passage is sung.


It's go time! I wanted the Firefly to move up so that I could get +2 dmg on the Errants. They had Defender's Ward and the +2 could really come in handy vs ARM18. In any case I got it up to catch at least 4-5 of them. Without Shielding the Protectorate jacks got toyed with and through various tricks I killed almost 2 with just the Ironclad as a potential target for retaliation. Lances, Firefly, Haley herself and a pod killed the Errants. I camped 2 just to be safe, if an Errant or three had survived I didn't want to lose to pop-n-drop.


My opponent discovers how helpless his list is when everything is caught in Temporal Shift.


I consolidate my advantage and start scoring. I disrupt the only non-crippled jack left alive.


There is just no damage output left in the Protectorate forces and I eventually move to 5CP.

Victory to the Swans!

:: Evaluation ::

There is not a whole lot to say about this game from an analysis point of view. Haley2 is a unique caster to play against and you really need practice, lots of it. On top of that I think Kreoss1 is one of the worse Protectorate casters to go into this matchup with. In theory he looks fine perhaps with Purification and a feat with both threatens Haley herself, but possibly more importantly also Thorn. However in practice he lacks the speed buffs and the shenigans which is typically what Haley struggles with. I also find that the game moves too fast for his feat or Purification to take effect.


Indian Summer Game 1 (#238): Haley2 vs Severius2

:: Prologue ::

This weekend I attended a tournament in a small city called Gjøvik. The attendants were a good mix of veterans and relative beginners and the event was great. Before we got there we had some car issues so we were delayed. Because of this the four guys in the car got paired against eachother. For round 1 I drew my regular Protectorate opponent. Drops were pretty obvious: Haley2 and Severius2. Game on!

:: Lists ::

Cygnar:
(Haley 2) Major Victoria Haley [+25]
- Thorn [13]
- Stormwall [39]
- Squire [5]
- Ironclad [12]
Journeyman Warcaster [4]
- Firefly [8]
Captain Arlan Strangewayes [4]
Lanyssa Ryssyl, Nyss Sorceress [3]
Storm Lances (min) [12]
Opponent:
Hierarch Severius - WJ: +26
-    Hand of Judgment - PC: 18 (Battlegroup Points Used: 18)
-    Blessing of Vengeance - PC: 13 (Battlegroup Points Used:
-    Reckoner - PC: 16
Allegiant of the Order of the Fist - PC: 3
Wrack - PC: 1
Vassal Mechanik - PC: 1
Choir of Menoth - Leader & 3 Grunts: 4
Idrian Skirmishers - Leader & 9 Grunts: 15
-    Idrian Skirmisher Chieftain & Guide - Chieftain & Guide: 5
Visgoth Juviah Rhoven & Honor Guard - Rhoven, Gius & Cassian: 9

:: Pre-Battle Thoughts & Deployment ::

The scenario was Outlast and I won the roll-off. The terrain was pretty skewed: 2 woods on one side of the map with literally nothing else meant that it would be very hard for Severius' forces to effectively get up ahead where they wanted to. Furthermore he had Rhoven so the woods wouldn't give me a lot of protection and lastly Haley2 is quite comfortable moving second in Outlast. I deployed heavily towards the right zone.


:: Game ::

Idrians receive Arcane Ward and spread out.


Notice my Lance deployment. With Lances like this (remember, they go down before Idrians deployment-wise) you have a pretty huge threat-range. While I can't get a good pod bottom of 1 (this is almost always impossible), the closest Idrian on my right side is 16.5" away. TK + TA lets me get there and, given the board, the Stormwall doesn't need to run 12". I decide to give it a go but unfortunately my Lance can't make any 8+ rolls and I fail to kill any models. I had hoped to force his Idrians up ahead to deal with this and kill 2 (2nd with electro leap) + jam 2 or so, but now it didn't look so good.


Severius wants to go for a hard denial play. Jacks move up on both sides, Blessing of Vengeance under Shielding ensuring that I can't take both zones in my second turn (along with the Monk who did his Stance on the left flank). The Idrians luckily only killed 1 Lance but they did give me a bit of a headache regardless.


A big problem was that I had placed my Firefly b2b with the Stormwall T1 for absolutely no reason. With Hand of Judgement sitting a juicy 11" away from the Stormwall I was definitely charging him. Having to move the Firefly first was a bitch though because I wanted to pod in the middle of the hardest-to-kill-Idrians and shoot the pod. Obviously that was impossible unless I could TK the Firefly and I certainly had no focus left to do that as I needed both Haley, Ironclad and Stormwall to get some work done.

So the Firefly tries to move, boost a hit and do work without help. Fails miserably as I don't make my boosted 9. Bad start. The Ironclad and Haley2 luckily perform better and Junior kills the annoying Idrian in front of the 'wall so that I can charge Hand. Stormwall charges in and kills hand despite Oracular Vision and pod a Skirmisher. The Lances kill the rest. Thorn contests the left. 2-0.

You might notice that the Squire is not in the picture. I forgot to move it but my opponent allowed me to put him within 5" of Haley. Rusty play on my part (I blame it on being away for a week) but very sporting of him!

The remaining Idrians jam and Protectorate shifts left.


I kill a Reckoner and some support models. Haley camps focus and receives Arcane Shield. I move to 4-0 and my opponent can't realistically do anything now so instead he goes for tie breaker points by killing off as much as he can and dominating the zone for 2 points.

Victory to the Swans!

:: Evaluation ::

Aside from a couple of technical mistakes like the Firefly b2b with Stormwall and forgetting to move the Squire, this was a very good game for me. I did most things right, but in hindsight the Lance move T1 is probably a little risky and uncalled for. If I don't cast TK I can get up Deflection instead (I wanted to camp 1 on Haley and cast TK on Ironclad to get him into the Trench) and abuse DEF15 and the fact that he can't get a lot of models into CRA range to place the Lances differently and still be relevant T2. I've learned from previous encounters with Severius2 that his feat is lethal so I wanted them to swing wide. I could perhaps have deployed them all on the right flank seeing as Severius was deployed centrally and could not realistically have shifted right.

Removing the Idrians in my second turn was a pain once the Firefly missed. It worked out in the end but I had just enough attacks to make it work. In hindsight I should perhaps not have been so focused on scoring the points early: If I can alpha the Hand of Judgement and kill it then I'm up on attrition and he's not scoring under my feat anyway. As such perhaps the better move is to charge the Hand and boost a pod to disrupt him so that he loses his focus (and thus prevent Oracular Vision
from stopping the charge damage). I'm not sure but it's an interesting thought as you can often get tunnel vision.

Haley2 is still a caster I'm very comfortable with into the Protectorate. All of my models here are big pains for them to deal with and get massive amounts of work done. The more experience I get with Severius2 the more I think this matchup is clearly in Cygnar's favour as well.

fredag 29. juli 2016

A Few Thoughts On Unconventional Casters

I don't remember if I have said it before or not on this blog, but I am a firm believer in unconventional approaches. The caveat is that they have to be solid. I like to think that I don't believe I am a little special unique snowflake when it comes to list building so it is not because of this that I believe in unconventional approaches. On the contrary I will happily copy-paste successful ideas if I believe in them.


So why do I still believe in these? It boils down to one main reasons: Playing something your opponents do not understand and learning how different dynamics affect the game. To understand this, consider a matchup and how different it is the first time you play it versus the 5th. We learn a lot and identify key mistakes, win conditions and gotchas in the matchups we play more than once. Considering the vast differences in lists, casters, metas, skill levels, scenarios and maps, it is practically impossible for anyone to know every matchup. Because of this, I believe the player with an unconventional approach holds an intrinsic advantage. In Mk. 2 I set out to try an experiment. Although the caster and the core elements were well known, the rest of the list combined to create something which people did not understand. While I believe this Haley2 shooting list was just broken, it was also clear to me that more or less every opponent I met failed to realize how they should have countered it. The list helped me get 4 tournament wins and 2 runner-ups out of 6 tournaments in total. For the especially curious readers, these games are all detailed in the battle reports section on this blog (check out reports #121 -> #134 in particular as these are from the same Con with a high average skill level).

Where am I going with this? While we cannot play every possible combination and thus have to rely on analysis to make choices, I think it is good to step outside once in a while to experience the breadth of our available options. This might sound funny coming from a guy having played 75 games in Mk. 3 yet only fielded 3 casters. The reason for that is quite simply that I believe that the most important thing to do if you want to play competitively is to learn how to walk before you learn how to run. What do I mean with this? I think we should all begin with what we believe is the strongest pairing and really play the shit out of that until we have learned it and feel that we master it. It is hard to pinpoint a number but suffice is to say that this requires a ton of games. After we have gotten to this point I think it is time to experiment. Those of you who have read this blog for a while might remember that I intended to play Kraye/Stryker 3 towards the end of Mk. 2. The only reason I ditched this was because Mk. 3 was announced and thus I saw little value in learning something that might change a lot (and indeed did with Kraye). I will admit that no small part of me wanted to cheese out with the Haley2 list while I still could as well.


While I am not at a point in Mk. 3 yet where I feel comfortable with a pair (or let alone having mastered both lists of said pair), I will get there sooner or later, at which point in time I will experiment. I love discussing ideas and having people to analyze and evaluate lists and games with and the closer our lists are the more we can get out of this in my experience. As such I made a bet with a friend. This guy loves to play unconventional things more or less all the time and I challenged him to sticking with Haley2 for the rest of the year. If he does that, I said, I will play a caster of his choosing (barring Blaize) and do my best to make said caster work in a pair, including taking it to tournaments I attend.


So John gave me a choice: Nemo1, Nemo2 and Sturgis. Truth be told I have looked closely at Sturgis in the past so I know what he does. The Nemos however have largely passed me by: I have glanced over their skillset and concluded that I don't believe they are top tier material. Now, before we go further I would like to stop for a second and make a point. Since Mk. 3 hit there has been a lot of talk about caster ratings. Isolated I find this meaningless to do. In a competitive environment it is all about a pair. I will dive into this topic more in-depth soon, but for now the idea behind a pair is that you should have an answer to other pairs. Preferably all possible pairs.


For Cygnar, I think Haley2 is just so much stronger than any other caster that she deserves one spot. She does not more or less autowin half the matchups in the game (as was the case in Mk. 2), but she still feels like she has an edge in a lot of matchups and a 50/50 shot ish in lots more. I have heard claims that she has 50/50 or more into virtually everything, and while I don't share that sentiment I still find her our easily best caster.

The good news for our pairing then is that we just need to cover her bad matchups. The bad news is that casters which struggle with the same matchups as Haley are more or less automatically left at home. Considering what I have faced thus far in Mk. 3 I have identified Skorne (Rasheth arm21 skew), Circle (Kromac1), Legion (Vayl2), Mercenaries (Thexus, MacBain) and Retribution (Ossyan) as hard matchups for Haley2. I am sure there are more but this is a start. Depending on where Vayl2 lands this might be better as well. Anyway. Back to John's selection then we are faced with the question of which of these 3 casters cover these the best.

I started looking at Nemo1. I didn't see much I liked because he feels like an inferior version of Nemo2. Not having Polarity Shield is huge, I feel. I spent some time dojoing with Nemo1 but given the list of adversaries above I failed to come up with a list where Nemo2 didn't feel flat out better. On top of lacking Polarity Shield I think Nemo1's feat is one of the worst in the game. While solos like Arlan, Lanyssa and Ragman allow an endless stream of focus I don't think it's enough. Nemo2 can basically achieve more or less the same with his feat and his spells are better. Focus Matrix also makes him able to get whatever he needs wherever he needs on feat turn. So following 30 minutes and 5-6 list variants I put Nemo1 away.


Sturgis is a caster I thought about in Mk 2. He is like Stryker1 in a way but with more shenanigans and less Invincibility. As I typically prefer the aggressive choice I probably would have gotten around to trying him but I gave up on upkeep intensive doublewalls in Mk. 2 because they had so many weaknesses. Fast forward to this challenge and the list basically writes itself: A wall on Sturgis, a wall on Junior, cycle Snipe and Arcane as needed, add Lances and some support. I think this list would be an interesting attempt to counter Haley2's problematic areas. I also looked into double Long Gunners as I feel it should be tested if you commit to Sturgis as cycling snipe looks pretty sexy. I put this away because I won't buy and paint Long Gunners, let alone two units, for an extreme list experiment when I see them having value basically nowhere else.

As far as Nemo2 is concerned I think he has to play multiple jacks and I think he wants them as cost effective as possible. He supplies what they need in terms of hitting power, focus and threat range. Being old man deluxe I fear for his survivability and having recently played Rahn with a Hyperion I respect Polarity Shield on a colossal a lot. To support this I needed some flexibility and the ensuing list ended up like this:
General Adept Nemo - WJ: +26
-    Ironclad - PC: 12
-    Stormwall - PC: 39 (Battlegroup Points Used: 26)
-    Lightning Pod
Stormsmith Stormcaller - 3 Stormsmiths: 5
Lanyssa Ryssyl, Nyss Sorceress - PC: 3
Ragman - PC: 4
Gobber Tinker - PC: 2
Storm Lances - Leader & 2 Grunts: 12
The other alternatives I could come up with all had various issues with multiple of the problematic lists above, be it dealing with sentry stones, not getting totally wrecked by Thexus' feat, have your caster unprotected etc. The list above and trying to come up with variants for Sturgis took me a couple of hours. While nothing is complete without playtesting my theoretical conclusion is that the best way for these casters to complement Haley2 is to arm-skew. I spent a little while debating with myself whether these casters could perhaps replace Haley2 so that e.g. Caine2 could take the rest. Then I came to my senses and discarded that idea. Haley2 is our strongest caster and in a 5-6 game tournament I expect her to play 4-5 games. Giving up on this makes no sense from a competitive point of view.


So I go back to John and I say: "Listen, I looked into those casters and all I could see solution-wise was a heavy arm skew. While I will stick to my challenge and play whatever you want me to I feel I should warn you that those games will likely be boring and the conclusion will be 'yeah it can work decently well with an extreme skew', which sort of defeats the purpose.". John agreed and after deliberating the remaining casters and excluding the obvious ones he landed on Stryker3.


It is kind of funny that I am back then to where I sort of started after I finally nailed my Haley2/Haley3 pairing in Mk. 2. Stryker3 has the unique ability of having the most damage output boost available for Cygnar in various shapes and sizes, while he does nothing defensively for his army or jacks. This is the very definition of a balls to the wall caster and I think this is the reason why so many love him.

I can't guarantee that Stryker3 won't end up with a vanilla or skew list kind of list but I see multiple options with this guy. He can make Trenchers devastating for example, PS14 autohitting with 4d6 damage rolls open up for different options. Looking at Murdoch we have interesting options in Nyss for example, or we can make Forgeguard downright ridiculous. While I am sure we will go back and forth on lists and possibly casters it is an interesting journey because I am looking at casters, options and matchups in a way I otherwise would not have.

Delaying this experiment until November is not arbitrary. Following the tournament success described above in Mk. 2 I got an invitation to the European Invitationals at ClogCon. I also have WTC in September and those 2 are my main goals this year. I want to maximize my chances there and besides I really want to find a strong tournament pair to form a comfort zone. However Norwegian Masters is in January so I will be taking a bit of an odd pairing to at least one significant tournament. I am fine with that though as this fact will make me work very hard. After all an experiment needs a serious test.

Just like Stryker3, it's about going balls to the wall.

søndag 24. juli 2016

Deployment, Patterns & Board Space Development

In chess, a lot of time and energy is spent on mastering the opening part of the game. Tons of theory has been written on the topic and it's acknowledged to be a crucial part to master to become a strong player. In my opinion Warmahordes shares a lot with chess. I think it's time we take a closer look at some of the related concepts that exist between the games.


What is your victory condition? Before you start a game, you should have a notion or two about what your options for winning said game are. If not, try and think about it and see if you can at least rule out extremes and come up with a hypothesis or two.

Typically, once you know a matchup, you'll have a clear and correct picture about how you typically win, unless the matchup is unplayable. Clearly identifying your victory condition(s) lets you take the planning a step further: In order to accomplish this specific goal, what do you need to do? Thinking about this in a structured way like this often reveals certain obvious things you might not have come across otherwise. For example, let's say you are playing Entrenched and there is no way you can achieve a scenario victory by camping your caster in your own zone. You certainly shouldn't feel obliged to put your caster behind that zone even. To many it feels safer, perhaps it even becomes a habit, but if it is in fact not a victory condition to have your caster there it's detrimental to your options.

In a way, this resembles chess opening theory. Prior to the game even beginning, a skilled chess player knows how the popular openings play out and thus move his pieces accordingly. One of the first things aspiring chess players learn for example is how not to lose in four moves (also known as Scholar's Mate).

Getting assassinated top of turn two is in many ways Warmahordes' equivalent to the Scholar's Mate. Picture from a Mk. 2 game between Haley3 and Lylyth2 where this happened. 

:: Overview ::

I: Introduction
II: Deployment
III: Patterns
IV: Board Space Development
V: Examples
VI: Conclusion


I: Introduction

Deployment is a very crucial part of the game. It broadcasts your ideas about the game, what you are trying to accomplish and what limitations you put on yourself. When I first started playing warmahordes I had my hands full trying to learn the game and the various rules. As I've played more and improved as a player, I've come to focus more and more on deployment as some of my gravest mistakes have happened at this stage of the game.

Patterns typically emerge in certain matchups. Once you learn how to approach a specific matchup you will frequently find yourself having your models in the same positions relative to your opponent's. Evaluating these positions either in-game or post-game can help you understand who held the upper hand and why. Perhaps there are measures you could have taken to improve your standing?

The map, scenario, matchup and who goes first will largely determine the board space development. Much like White tends to seize the initiative and look for openings in chess, the first acting player in Warmahordes seeks to establish a dominant position from which an opponent is forced to reply instead of playing his own game.


These conceps are closely related. Failure to understand any of these can result in a loss. Succeeding in understanding them and capitalizing on that can often win you a game outright, to the point where it might not even be down to die. I've heard opponents saying they feel like they are completely out of options as early as bottom of the first turn, which is often because I've managed to capitalize on their misunderstanding of the dynamics of the matchup. I've often felt the same way myself as well, at which point I try and go back to understand where I went wrong.


II: Deployment

Deployment. The first thing that happens in the game and something I believe many players take too lightly. Before deployment, the first thing you should do is agree with yourself on what your win condition is. Can you win on attrition? If not, what about scenario? What assassination angles are relevant?

Can you tell from this picture what my intended win condition is here?
This is hugely important because the answer to this question determines what the optimal deployment
looks like. If you can't answer the question, go with your gut feeling. Try your best to deploy accordingly. Ask yourself in hindsight, preferably with pictures from the game, did my deployment help me achieve my goals?

I'd like to illustrate my points here with an example from my games so I can show you what my thinking was beforehand and how my deployment helped me execute the plan.

The example here is from a scenario victory game. I was playing Entrenched against Baldur2 where he brought two Gargantuans. I don't think I can grind that down but he should be susceptible to assassination angles if I can get Thorn and/or heavy hitters around him. Furthermore, I know from experience with Stryker1 double Stormwall that two huge bases with SPD5 are very, very hard to move around.

Based on my opponent's deployment then I made the decision to go for my own zone. My win condition was to simply physically block him out from contesting me and slowly edge my way up to 5 points. If possible, I also wanted to try and get Thorn at least around his Wolds so as to threaten Assassination.

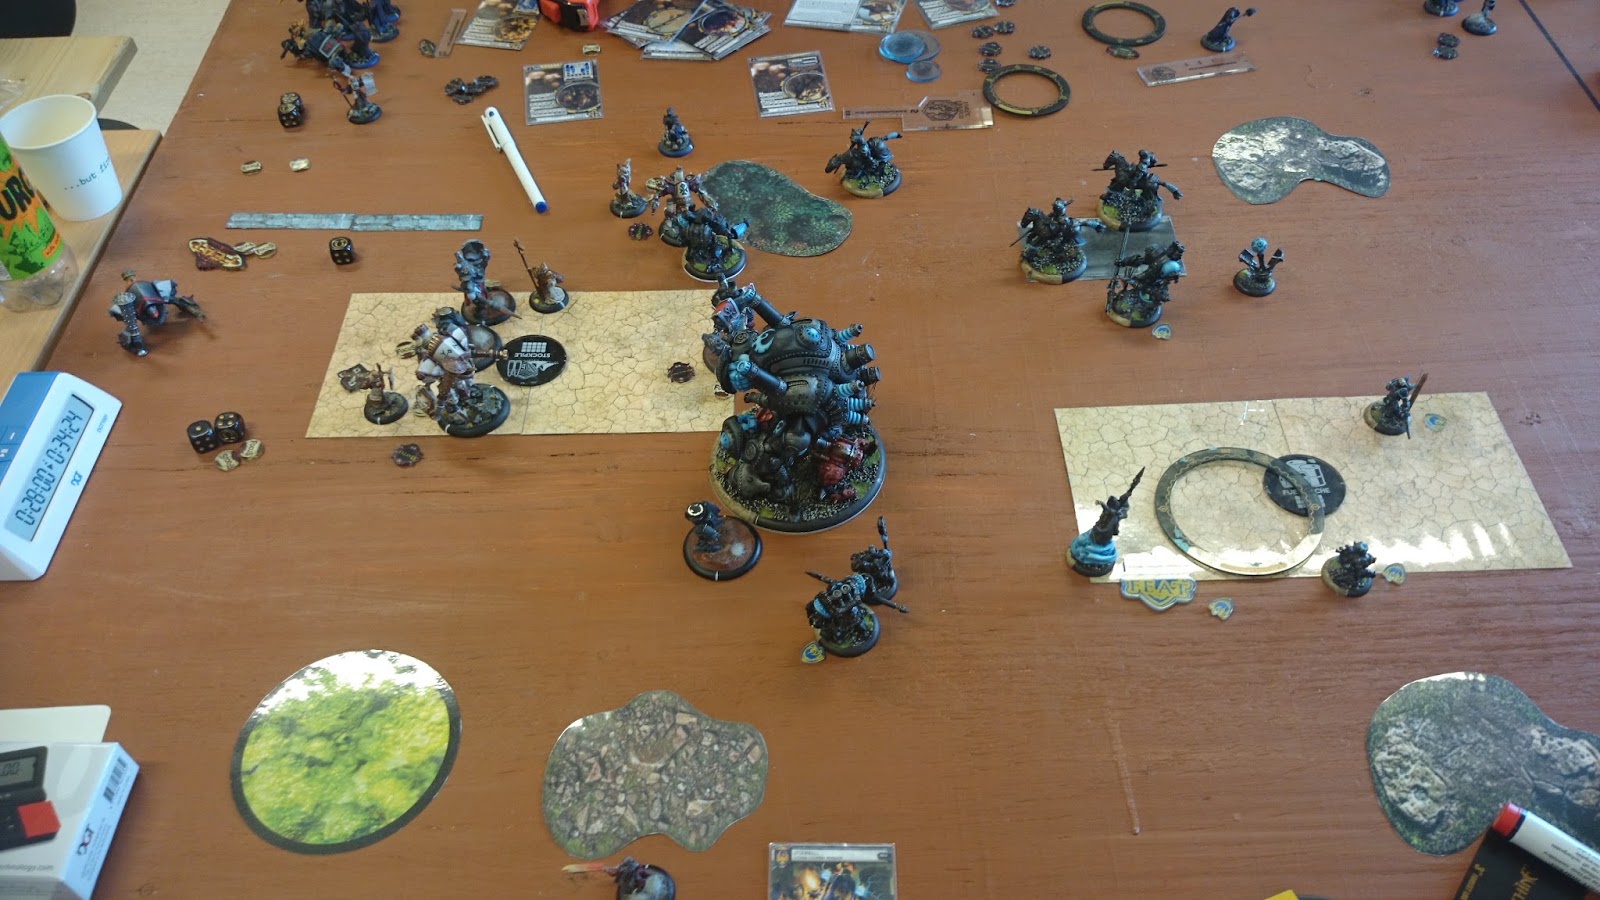
Take a look at this picture:


How is he going to contest me from here? How did we end up in this position? You can read the report here and see if you can recognize the concepts in this article. Try and look for how my deployment enabled the position above.

The one most important question you should ask yourself when you have finished deploying your models (but before you clock over) is: "Do all of my models help me accomplish my win condition from where they are now deployed?".


III: Patterns

Your army as a whole creates a threat projection which affects what an opponent can and cannot successfully do. I've written about this previously and how the dynamics of these threat projections affect games: The Ping Pong Theory.

Stormwall and Ironclad in positions to rush up and both apply their power and protect Haley2. Storm Lances and Firefly flanking to secure Haley's intended spot. A fairly classic pattern for this list. 

Various models produce different threat projections. Some are explicit, some are implicit, some are easy to spot and some are hard to spot. Regardless, setting up for any kind of successful attack or defense requires you to make the most out the choices you have at hand. These work together and often their optimal positions for cooperation is close to completely irrelevant of what you are fighting against. Relevant concerns include traffic jams (i.e. your models are blocking eachother from getting to optimal positions), getting in range to provide bonuses (Squire, Reinholdt, Gobber Tinker, Arlan, Junior for Power Up etc) as well as the aforementioned threat projections. What's fascinating with these elements is that how they affect your overall position is not something you can deduce on paper. You need to play games and see how these end up in practice. Some situations are trivial but learning how to have Arlan in range for the next turn possible repair action without exposing him to unnecessary danger takes time.


With pre-measuring we can plan the support better than we ever could before. We can also to a large degree plan our entire turn before activating a single unit, or even handing out focus. Coming from Warhammer this is something I am used to doing a lot and I think most players have a lot to learn here. Properly using proxy-bases and pre-measuring when applicable gives you a big advantage as you uncover flaws in your plan you weren't able to visualize, as well as confirmation that an angle you saw indeed is valid without exposing yourself too much.


IV: Board Space Development

Many matchups develop a certain dynamic based on who gets first turn. The threat ranges in this game are frequently of such a nature that the 2nd player cannot simply push his models up ahead at full speed. As the game goes on the momentum will flow back and forth (as per the Ping Pong Theory). Knowing how the board will look ahead, e.g. how your opponent is likely to react to your turn, gives you a big advantage as you can already set up a counter move for his would-be optimal position.

Would you feel comfortable pushing the Cephalyx models full speed ahead into this Cygnar army?
Knowing your own army and your opponent's army allows you to deduce a number of things based on his deployment and evident patterns. Pay attention to what his likely win condition is and how his pieces are set up to accomplish said win condition. By doing this you can play as though you are always one step ahead. There's no other way to do this than to get practice games. Understand the matchup, the nature of its dynamic and how your opponent's decisions can be exploited before they've even materialized on the tabletop. This goes both way: Sometimes you have to think offensively, sometimes defensively. A classic case for this in Mk. 3 I believe is Haley2 vs Rahn. Whoever moves first dictates what the opposing player can do to a large degree, sometimes even taking away win conditions completely (e.g. forcing Rahn to play attrition instead of assassination as the Chimera's angles to Haley are simply blocked by how you're claiming the table with your models).

There is no one answer to how this works. Typically the first player claims the majority of the table space and the second player has to respect this. However casters like Sloan and Vayl2 have such extreme threat ranges that you can quickly find yourself having to be cautious even as the first player. If you understand the dynamics of the matchup though you can typically "read" your opponent's thoughts and ideas just as though he broadcasts them based on deployment and his optimal army patterns alone.

Father Lucant caught in a horrible spot because I exploited his failed aggressive deployment. I knew this matchup well enough to know that I could stall a push towards my own flag quite easily. The situation he faces above was thus a result of me adapting to capitalize on the Convergence deployment mistakes. 

V: Examples

Haley2 vs Father Lucant. In this game I basically broadcast my strategy as follows: The Stormwall will move on the side of the central obstruction which allows it to put the most pressure on the Convergence forces. I have Thorn and the Ironclad set up to run to where they are needed as well and the Lances will likely keep Haley's flank clear. I don't care about broadcasting this because the Convergence list doesn't have the speed or the threat range to punish me before I've had a chance to adapt, seeing as I move first. Against other casters I might need to position Haley or the Lances in a less commital position to allow myself to respond to my opponent's deployment in a better way.

As the game evolves I have a typical pattern at the end of my second turn: The Ironclad has been sent in and wrecked a heavy, the Stormwall is protecting Haley and zoning a pretty big portion of the map and the Lances are ready to counter-attack whatever comes up to contest. Note that the support pieces are all in good positions here as well. By capitalizing on my opponent's deployment mistakes and sticking to my optimal patterns I claimed more or less the entire table which ensured a scenario victory.


Sloan vs MacBain. In this game I am not moving first and I anticipate that my opponent will respect my firepower with the Galleon and thus not move within threat range of Sloan or Defenders in the first turn. Notice how I deploy these elements to slow him down as much as possible. One of my fears in this game is letting the Galleon get a ton of shots on Sloan so keeping him far back is the best bet. The deployment is also symmetrical so that I can funnel him into a killzone eventually.

As the game progresses I shuffle my models around a lot to respond to the various pushes which the Mercenary forces attempt here. Sloan's extreme threat ranges however allow me to keep the Lances safe from shooting while MacBain is unable to score and I win the battle of attrition eventually.

Caine2 vs Exulon Thexus. When I play a Stormwall with Caine2 one of the most important things to do is to cover the angles so that an opponent cannot set up a wombo-combo to one-round the Stormwall. That is typically disastrous. In this game then I deployed so that I could advance the Stormwall max in Turn 1 and threaten an opponent wanting to deny said Stormwall a contest angle in my second turn.


With the entire army converging towards a fairly aggressive point, the Cephalyx are left with a bit of a dilemma: Go all out and tank whatever I throw in his face or slow down and let Caine establish control of large parts of the table? My opponent chose the former and the alpha I got crippled him.

Haley2 vs Wurmwood. This last example shows a different situation and one which many people struggle with in my experience (myself included). When you have to respect your opponent's extreme threat ranges you play a very defensive game. At the same time you can't completely give up on the board space because you'll eventually be crushed on scenario. Wurmwood's Curse of Shadows + Stranglehold combination is very powerful against colossals. As such I moved the Stormwall up more to the flank than ahead, making sure Cassius would not be able to run and channel Curse of Shadows.


The Ironclad is positioned directly ahead of the Stormwall. The positon of the Lances allow me to possibly move up and take control of the left flank of this table unless my opponent finds another opening. Wurmwood struggles with traffic jam issues and time due to having so many models which need precise patterns to function optimally so here I am basically trying to just buy time and pressure Circle to make a hasty move. That works out well for me as he commits with his feat and I win on assassination.

VI: Conclusion

We've looked at deployment and how it often broadcasts a strategy. The patterns an army wants are often independent of what you are facing. Board space development is crucial to establish a winning position. Can you claim a part of the table or are you constantly pushed back? There is no silver bullet for any of these concepts but they are closely related and can all be analyzed on a case-by-case basis. The important thing to remember is to have a conscious relationship to these conceps so that you can analyze what you could have done better and where you went wrong. Once you get better at it you will be able to predict what your opponent will do and already have your pieces in place to capitalize on his mistakes and opportunities presented.


It is very hard, if not impossible, to fight an opponent which seems to know your every move in advance. In the same way a chess opening advantage of a pawn can lead to a win, it's only a matter of time before the advantage builds up to to 5CP or an assassination.

Checkmate.