mandag 27. februar 2017

Battle Report #438: Stryker1 vs Wurmwood

:: Prologue ::

The last game from yesterday: Wurmwood! Thus far Nemo3 is the most comfortable caster I've ever played against the tree and I'm not sold on Wurmwood being "out" just yet. As such I need to know whether Stryker1 or Haley2 is my drop into Circle. My opponent's list was fairly vanilla, a perfect test for Stryker boy!

:: Lists ::

Cygnar:
[Theme] Heavy Metal
(Stryker 1) Commander Coleman Stryker [+30]
- Firefly[8]
- Stormwall [39]
- Stormwall [39]
- Squire [0]
Captain Arlan Strangewayes [0]
Journeyman Warcaster [0]
- Charger [9]
Lieutenant Allison Jakes [0]
- Charger [9]
Opponent:
(Wurmwood 1) Wurmwood, Tree of Fate [+27]
 - Cassius the Oathkeeper
 - Pureblood Warpwolf [17]
 - Pureblood Warpwolf [17]
 - Feral Warpwolf [18]
 - Loki [19]
Sentry Stone & Mannikins [5]
Shifting Stones [3]
Wolves of Orboros (min) [7]
Gatorman Bokor & Bog Trog Swamp Shamblers [11]

:: Pre-Battle Thoughts & Deployment ::

Take and Hold and I move first. Hardly an optimal map for putting pressure on Wurmwood and killbox ensures that I have to move up ahead. I get first turn so the push is on!


:: Game ::

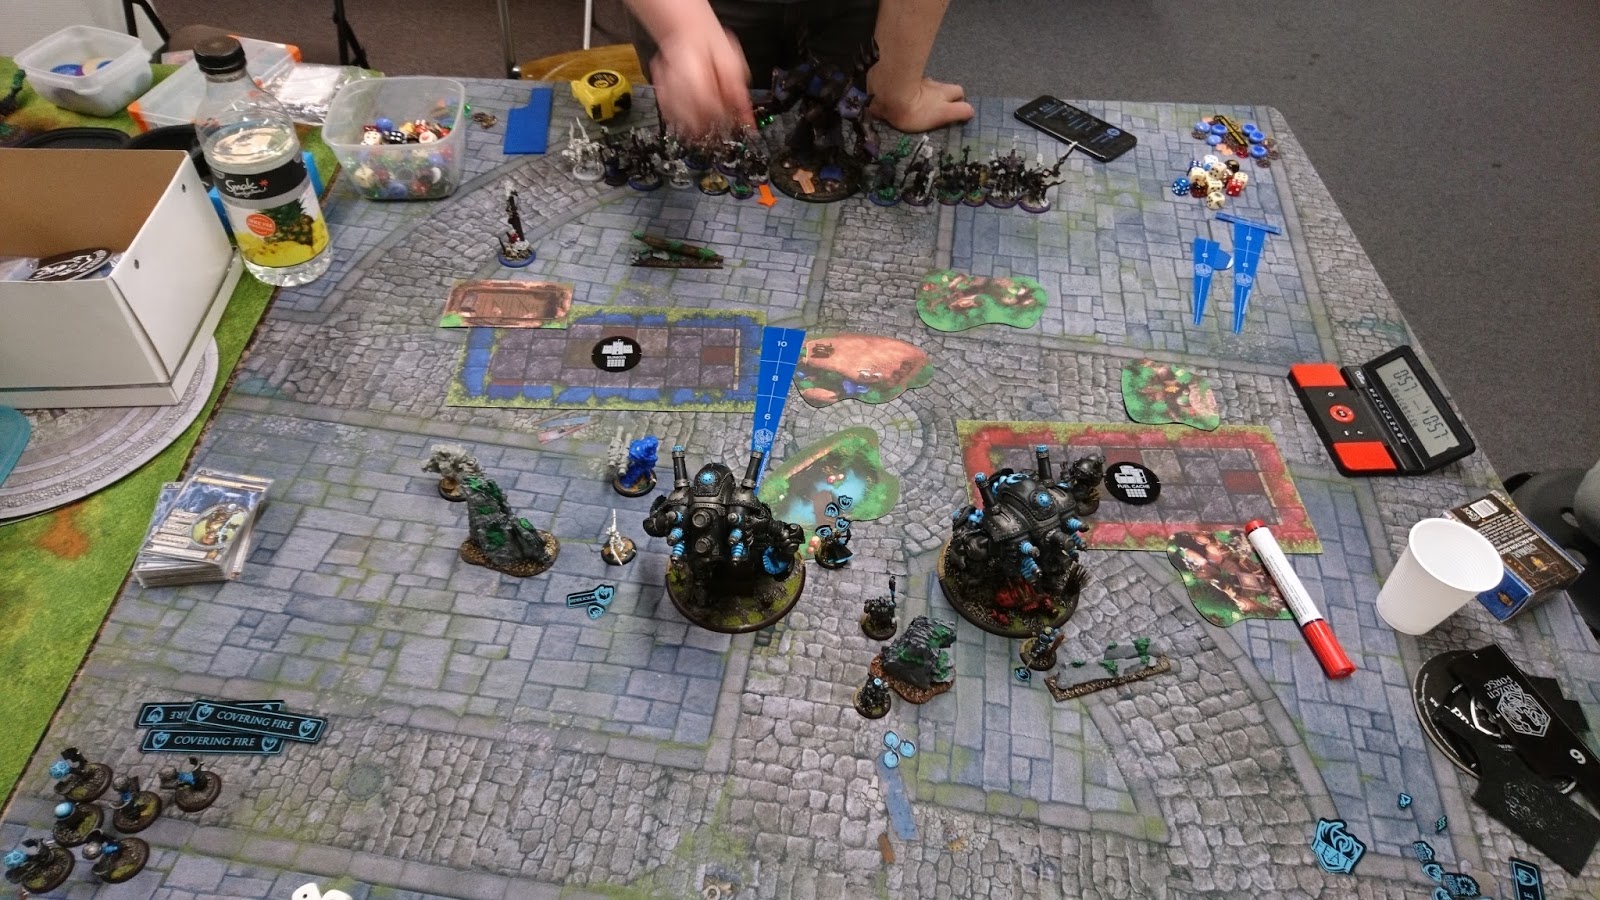
Blur on Stryker, Sidekick on a Charger. Junior's on the left flank. Firefly centrally.


Wurmwood pushes out. LoS-denial in the center with Cassius killing bog trog things.


Crucially the sentry stones are both within my Chargers' threat ranges (!). I decide to make a big play by going for both Sentries and feating. I allocate to each 'wall, the idea is that they'll trample and boost pods if either Sentry Stone survives. The right one does but the boosted pod damage roll is low. Oh well, at least I've forced the issue!


The thing about facing 2x ARM27 colossals is that you're facing 2x ARM27 colossals! Wraithbane and Curse of Shadow greatly help mitigate this but the damage output isn't nearly there still. Wurmwood's afraid to back off to the top left corner because basically everything I have is pointing in that direction. Instead he makes a play towards the top right corner and a Pureblood with Primal is sent to deal with the Charger on the right. Feat goes up.


I want to kill the Shamblers, leave the Pureblood to frenzy on a Mannikin and carve out a little place for myself on the left side, having a 'wall take his flag for a CP. This all works out wonderfully.


The Feral on the left flank receives Wraithbane. He warps Strength, is pulled in by Hellmouth and charges the closest 'wall (which was cursed). Dice damage is a good start, but so is 56 boxes and I survive with cortex intact.


Stryker1 tricks! A huge base is less than a 5" aoe. The right-most wall moves up to shoot the Pureblood which frenzied last turn, placing itself B2B with the Feral. Shots do horrible damage because that's what shooting does against Circle heavies. Stryker then Earthquakes this 'wall and this knocks down the Feral. The second 'wall kills off the Feral. The Firefly and Jakes finish off the Pureblood in the center.


The grind is lost, assassination is entirely off the table and there's no scenario play. Wurmwood concedes.

Victory to the Swans!

:: Evaluation ::

Wurmwood's LoS-denial is a problem for sure. I also think Wurmwood gets to buy a lot of space if he goes first. He will likely get the alpha and more careful play allows the Sentries to survive, which can set up for the Mannikins to harass the light jacks all day long. I'm not sure I really like this matchup. Storm Division Stryker1 is probably better, but then again that's worse against Krueger2 so there's that.

I think that with a pairing of Haley2 Storm Division and Stryker1 Heavy Metal the former is my preferred drop into Wurmwood. Haley still has tons of angles and the Lances are problematic for Circle to deal with. That being said this definitely feels playable as well and Stryker's feat is just such a nightmare for Wurmwood.

A great set of games, I learned a ton and got even more to contemplate. I love this game! 

Battle Report #437: Stryker1 vs Haley3

:: Prologue ::

Haley3 into Stryker1 Storm Division felt terrible. Would Heavy Metal be easier for her? Seeing as I'm looking towards Stryker1 Heavy Metal to be my mirror drop I need to find out. I got a fellow Cygnar player to play Haley3 against me and we went at it!

:: Lists ::

Cygnar:
[Theme] Heavy Metal
(Stryker 1) Commander Coleman Stryker [+30]
- Charger [9]
- Stormwall [39]
- Stormwall [39]
- Squire [0]
Captain Arlan Strangewayes [0]
Journeyman Warcaster [0]
- Charger [9]
Lieutenant Allison Jakes [0]
- Charger [9]
Opponent:
(Haley 3) Major Prime Victoria Haley [+25], Bunker
- Grenadier [9]
- Grenadier [9]
- Thorn [13]
- Defender [16]
Storm Lances (max) [20]
Trencher Infantry (max) [16]
Journeyman Warcaster [4]
- Charger [9]
Ragman [4]

:: Pre-Battle Thoughts & Deployment ::

Recon, Haley3 takes first turn. Idea? Covering fires to push her back, flank with Chargers, decisive move for scenario.


:: Game ::

Haley3 advances and clouds up. We discussed this and in hindsight it's probably better to dig in. Buys more table space.


My Stryker positioning here is awkward so an assassination might be viable. Apart from that it's a vanilla advance. Note to self: Careful with Force Hammer angles. Snipe on the left 'wall.


Clouds back up. That's right bitch, move!


Chargers are starting to get angles on the flanks. I make a strategical mistake and a mistake I didn't even consider: I start shooting the objective here. Just a tiny bit, it's a bunker, but I should not have. It's working for me here, basically, not against me. Furthermore I fail to put a covering fire on top of the objective...


...which provides my opponent with an excellent angle to get back into the game: Kill his own objective and push those clouds, boy!


One 'wall has started taking damage following my mistake last turn. I want to make a decisive play here so I trample both 'walls up, feat and pod Trenchers to death. I also land a couple of melee attacks so electro leaps help clear stuff out.


The left 'wall doesn't have Arcane Shield. It's ARM24. The funny thing about this Haley3 list, which I know very, very well, is that it packs one hell of a punch. If you can land Ragman and have enough landing space you can deal a -ton- of damage. Sure, Haley3 has Repudiate so the Arcane Shield would've disappeared regardless. However what she does not have is infinite focus. It's the basic "Haley dilemma", no matter which iteration of the caster you play. She has tons of options, but with a finite amount of focus she has to weigh them against each other and miss out on some of them.

In this particular case there was no need for repudiate, so she handed out focus across the board to Thorn, Ironclad, Past kept all of hers... The left wall took a brutal amount of damage (we ran the numbers and with Ragman Haley3 is indeed close to killing it on feat turn) and barely survived with 2 boxes (including cortex!) intact.


My opponent is way down on the clock. What I need to do here is kill Past to prevent her from doing more damage next turn. I allocate max. to both walls, start with one of them who punches a Grenadier and a Charger to death. Stryker then Earthquakes a pod so the second 'wall kills Past and the Ironclad with additional damage by electro leaps. I fail to disrupt Thorn with a pod. So annoying. Chargers keep pumping shots into Evil Cygnar.


One 'wall is cleared out easily enough. The Lances start working on the second. Past is spawned.


At this point in time I'm way up on the clock and playing Haley3 is often a race against time (yeah, I did that) so I figure I'll just try and clock my opponent. I KD Lances with Earthquake and clear them out with the Stormwall.


My opponent does kill the 'wall but runs out of time.

Victory to the Swans!

:: Evaluation ::

The covering fire mistake cost me dearly. I also think Stryker is probably better off trying to go for a flag in this matchup, at the very least setting up so that he's able to do so. The Echoes are hard to clear from the zone so getting to 5 could be a problem for sure.

This matchup feels up, but it's probably more even than Storm Division would have been. The electro leaps do so much work against Haley3 it's not even funny. From the games I've had with Stryker1 thus far I think I need a Firefly. Maybe 2, but we'll start with 1. In mirrors against Storm Division I believe the 'walls and my shooting are sufficiently strong anyways so I can probably live with 2 Chargers, possibly also 1.

Battle Report #436: Haley2 vs Harkevich

:: Prologue ::

Following my adventures against Amon previously I pretty much concluded that I don't believe Stryker has game into Harkevich, not in heavy metal anyway. That makes it very hard to justify ditching Haley2 from the pair. It does pain me because I love Nemo3, but I can't afford to struggle with both Protectorate -and- Khador when I have a really strong answer to the both of them. As such it was time to practice Haley2 into Harkevich again!

:: Lists ::

Cygnar:
Vanilla Haley2 Storm Division
Opponent:
Harkevich
- 4x Kodiak
- 2x Destroyer
- Juggernaut
- Marauder

:: Pre-Battle Thoughts & Deployment ::

Extraction with Khador going first. I set up to crush one flank, hold the other and anticipate a grind for position.


:: Game ::

Much to my surprise, Harkevich abandons all safety, runs all his jacks up without a single cloud and it's me. I contemplate trying to drag a jack out with Domination or something but figure it's better to bide my time, spread out and shoot with TA instead. I target the Marauder and my dice are hot - it's down to single-digit boxes!


Continuing his all-out aggression, my opponent commits 4 jacks to jam me with the other 4 in reserve. On my left flank there are 2 Kodiaks, on my right there is a Marauder and a Kodiak.


By TK-ing the Kodiaks furthest away from Harkevich they move outside of his feat range. I figure this sounds like a good start so I go for it. The Firefly body-blocks the remaining Kodiak from reaching Haley with its steam on the left and with its full focus + Lances with Laddermore + Ionization bonus the other Kodiak there goes down! The Stormwall kills the wounded Marauder and the big Lances + Laddermore finish off the Kodiak on the right flank. Thorn runs to engage both Destroyers, don't want these guys targeting the objective and boosting Blast on Haley. Big mistake of me to ditch Force Field here, which I originally cast T1.


Khador cannot do a whole lot. The Kodiak on my left throws a Firefly on Haley and that's about it.


Thorn knocks out the left Marauder's Cortex and disrupts the right one. Lances, Stormwall and Laddermore engage. Haley backs off to relative safety.


The Juggernaut tries to hurt the Stormwall. The damage simply isn't there. From here on out it's a mop-up.


Victory to the Swans!

:: Evaluation ::

Cygnar is comparatively pillow-fisted in melee. What enables us to grind so well is our ability to force the grind to take place over multiple turns. Haley2 does this very well. I think that this game more than anything shows how incredibly hard it is to try and bumrush her. If you know how to play her you'll untie the knot trivially and deal a game-breaking blow in return.

Harkevich has the cloud tools to try and force a favourable position. I think that's the way this game needs to be approached. His greatest strength is forming an impenetrable cluster of jacks. True, this is also a weakness in split scenarios, but his skill-set pretty much dictates this approach. Bumrushing might work in other situations but not against Haley2.

Battle Report #435: Stryker1 vs MacBain

:: Prologue ::

Yesterday I played 4 games. Yesterday was a good day. When I got home I was too tired after a long weekend (including a 3-hour long concert with Dream Theater on Saturday), but now it's time to get those reports up! First up is a very interesting game between Stryker1 and MacBain.

:: Lists ::

Cygnar:
[Theme] Heavy Metal
(Stryker 1) Commander Coleman Stryker [+30]
- Charger [9]
- Stormwall [39]
- Stormwall [39]
- Squire [0]
Captain Arlan Strangewayes [0]
Journeyman Warcaster [0]
- Charger [9]
Lieutenant Allison Jakes [0]
- Charger [9]
Opponent:
[Theme] The Kingmaker's Army
(MacBain 1) Drake MacBain [+30]
- Buccaneer [6]
- Galleon [39]
Greygore Boomhowler & Co. (min) [11]
Steelhead Halberdiers (max) [11]
Steelhead Heavy Cavalry (min) [11]
Trencher Infantry (max) [16]
Stannis Brocker [0]
Orin Midwinter, Rogue Inquisitor [0]
Kell Bailoch [0]

:: Pre-Battle Thoughts & Deployment ::

Together with my opponent I dojo'd MacBain on the plane home from SmogCon. The basic idea was that MacBain could be built to handle Protectorate. By going theme with him you can get so many bodies on the table. Boomies were supposed to be the feat-jamming unit (because they cannot be trampled) with the damage dealers following behind. Stryker1 should prove to be an interesting test as well: Covering Fires is a serious problem, but feat and counter-measures should help buy time. Let's jump into the game!

:: Game ::


Mercs have advanced behind Trencher clouds. Counter-Measures are up on the right unit of Steelheads (yeah, some heavy proxing involved here). In return I advance, put up covering fires and shoot 4x big gun shots on the Galleon. It takes significant damage.


Feat rolls max. and the front line of Trenchers + Cav receive the benefits. The beauty of feating on Trenchers like this is that even if they're knocked down they can upkeep the clouds the next turn.


I can't kill much and counter-measures prevent me from trying to get work done at a distance as well. The right 'wall throws a cav model onto another. This gives me a 5" bubble to shoot from with the other 'wall and Junior's charger. I feat in return because otherwise I fear I'll just lose a 'wall, if not both.


So here's the gist of the MacBain dojo: Post-feat you simply jam. You flood the table with models, keep MacBain safe behind clouds and wait for openings to appear. Counter-Measures is switched over to the Steelheads.


I try and kill off the Steelheads but I can't get them all so the last Stormwall has to punch stuff in melee. Ugh, not good.


The rest of MacBain's models run/charge in. The Galleon kills the right 'wall with help from Jackhammer.


It's looking bad. I'm behind on CP and attrition, I cannot reach the Galleon and Orin blocks my trample path. I decide I'll try an Earthquake on Stannis and have Jakes and her Charger deal with Orin and then trample up. If nothing else that should open the board up quite a bit. In any case Stryker fails his Earthquake despite the re-roll from Squire so there's that: Would have taken too many free strikes so I abort the plan and try and clear out around the 'wall instead. It doesn't work out, I can't even kill Stannis with full focus.


Galleon goes in and leaves the 'wall without Cortex, on 3 boxes or so. Crucially, MacBain is knocked down by his Buccaneer...


I have one last shot: Charge MacBain with Jakes' Charger. To do so I have to kill Orin. Jakes does this. The Charger goes in but ARM17 is a thing and he's left on a couple of boxes. Stryker can Arcane Blast the objective and boost blast damage on MacBain. I go for it, needing 11+ to kill him, but unfortunately I cannot make the roll and thus lose the game.

Sadly, a Loss to the Swans.

:: Evaluation ::

Very close and interesting game! MacBain's feat is a pretty sick timewalk in more than one situation for sure. It completely shuts down my list and counter-measures ensure I can't keep the rest at bay either.

I think I had a bit of an over-cautious position with Stryker early on. Failing to have angles for Earthquake meant I had to respect the cav too much on MacBain's feat. If I could've knocked them then the Stormwalls would be more free to deal with other models. As it were I simply couldn't afford to have them fully operational, with flank they're just so brutal.

It was really cool to see MacBain working as intended. The Boomies were bad because they frankly aren't fast enough so I anticipate these'll disappear quickly in favour of more cavalry models.

A great start to the day, I had many games lined up to better my understanding of various matchups!

fredag 24. februar 2017

Battle Report #434: Stryker1 vs Amon

:: Prologue ::

Rematch time! We switched up the Amon list to our experimental variant and my Stryker list remained the same.

:: Lists ::

Cygnar:
[Theme] Heavy Metal
(Stryker 1) Commander Coleman Stryker [+30]
- Charger [9]
- Stormwall [39]
- Stormwall [39]
- Squire [0]
Captain Arlan Strangewayes [0]
Journeyman Warcaster [0]
- Charger [9]
Lieutenant Allison Jakes [0]
- Charger [9]
Opponent:
Theme: The Creator's Might
3 / 3 Free Cards     75 / 75 Army
High Allegiant Amon Ad-Raza - WJ: +29
-    Hierophant - PC: 0
-    Judicator - PC: 36 (Battlegroup Points Used: 29)
-    Dervish - PC: 7
Vassal Mechanik - PC: 1
Vassal of Menoth - PC: 0
Covenant of Menoth - PC: 0
Wrack - PC: 1
Wrack - PC: 1
Choir of Menoth - Leader & 3 Grunts: 4

:: Pre-Battle Thoughts & Deployment ::

Same scenario and terrain. This time I got to go first. The idea was to commit more centrally now and see if I could wait things out more. Judicator is a super dangerous piece with Amon, on my feat turn I risk losing a 'wall if I'm not careful. That's... scary.


:: Game ::

Snipe on a wall, Arcane Shield on a wall, run stuff. Jakes on the left, Junior on the right.


Fortify on Judicator, spread out forces.


Bide my time, shoot a little, Snipe on Stryker for Disruption, Arcane on both 'walls.


Judi receives battle to try and kill my objective. She fails.


The state of the game is a lot more open now. I intended originally to try and make a play here for scenario. It ended up kind of being that as well: If I could contest his zone in his turn I'd be good. However I failed to place one of the Chargers within feat range. That's... Bad. Shooting did some work, since he sang Battle last turn I had a few more targets now.


Both Chargers died. 2-2.


I make a mess of a turn: I was thinking the 'walls could get close together but that would leave one within Judi's charge range. Not good. I clear the zone and go to 3 though.


My opponent jams me up as best as he can and kills the objective. 4-3 favour of Amon.


I have to get so much work done here and still kinda be lucky. The idea is to kill the jamming Covenant in front of my right Stormwall, have that kill the Dervish in front of the left Stormwall, have the left Stormwall kill the two Dervishes in the zone (one had 1 box left) and lastly have Stryker disrupt the remaining Dervish on the hill. That leaves Jakes and a full-health Stormwall for Amon to kill, as well as a pod.

The first Stormwall fails to kill the jamming Dervish. Really? I try to help out with Jakes. Still not enough. Desperately I try Arlan. Still not enough. Oh wow. The 'wall has to run then, but at this point I am contesting only with the 'wall and there are 2 Dervishes which can charge it on full focus to help out. Odds are definitely not in my favour. Amon makes the kill, contests my zone and thus wins the game 5-4 on CP.

Sadly, a Loss to the Swans

:: Evaluation ::

Again a really close and exciting game. Judicator's sheer presence is problematic for sure. Even on feat turn she can dish out a ton of pain against a 'wall, outside of feat turn she's a nightmare. I managed to play the ranged game a lot better this time around, getting off Stryker's pistol to help out, using the Chargers better (though I think I threw them away and feated too early in hindsight) and getting the 'wall with Magical from Arlan in range to shoot Dervishes with chain cannons as well.

Matchup feels really even. I'm not sure whether Judicator on Amon has come to stay but it sure is an interesting piece and he grants a colossal a lot of what it needs: Speed, durability, hitting power, accuracy. What's not to like?

Amon's damage output has made me think a little about my intended pairing of Stryker1 and Nemo3. The reason in theory I'm replacing Haley2 with Stryker1 is because they both basically have a time walk feat. However they are quite different because Haley's feat is largely a time walk against melee armies whereas Stryker's isn't necessarily. Sure it is effectively a time walk in mirrors but Cygnar is objectively pillow-fisted. The damage levels other factions can get to are sometimes high enough to simply power through Invincibility. I haven't made any decisions yet but I need to look at the various matchups involved, indeed perhaps I'm better off simply going Haley2 + Stryker1, thus having Stryker replace Nemo instead of Haley. Patrick took SmogCon with that pairing so I can easily see that being the best.

More games will follow on Sunday and in the meantime I'll keep analyzing matchups and strengths among these 3 casters. Decisions!

Battle Report #433: Stryker1 vs Amon

:: Prologue ::

Time to put Stryker to the test! If Stryker1 is to replace Haley2 in my pairing, he needs to show that he can handle some pretty serious matchups. I asked a Protectorate playing friend of mine for a couple of games today and he happily obliged. We discussed the factions and lists before the games and dojo'd together a fairly vanilla Amon variant as well as an experimental version. The first game was against the vanilla list. Let's jump right in!

:: Lists ::

Cygnar:
[Theme] Heavy Metal
(Stryker 1) Commander Coleman Stryker [+30]
- Charger [9]
- Stormwall [39]
- Stormwall [39]
- Squire [0]
Captain Arlan Strangewayes [0]
Journeyman Warcaster [0]
- Charger [9]
Lieutenant Allison Jakes [0]
- Charger [9]
Opponent:
(Amon 1) Theme: The Creator's Might, High Allegiant Amon Ad-Raza [+29]
- Dervish [7]
- Dervish [7]
- Dervish [7]
- Dervish [7]
- Devout [9]
- Indictor [15]
- Crusader [10]
- Crusader [10]
- Crusader [10]
- Crusader [10]
- Hierophant [0]
Choir of Menoth (min) [4]
The Covenant of Menoth [0]
Vassal of Menoth [0]
Vassal Mechanik [1]
Vassal Mechanik [1]
Wrack [1]
Wrack [1]

:: Pre-Battle Thoughts & Deployment ::

We were playing Entrenched and Amon seized the initiative. I picked the side where my colossals would have the most freedom in terms of movement and off we went!


:: Game ::

Due to choir issues the Indictor didn't receive Passage. It received Fortify and Enliven and ran up. ARM23 is a thing, right?


I decided to see if I could get lucky, loaded up all Chargers and the 'walls, then moved the first colossal within 12" of the Indictor. He was in rough terrain so he could not enliven away (mobility is turn only). Dice were hot and he lost his shield. This allowed the second Stormwall to follow up with some serious damage. Not bad!


This time Passage was the choice and the Protectorate forces spread out. I had a couple of Dervishes on my right causing issues.


I wanted to make a decisive play. The Indictor had set himself up to initiate the piece trade instead of lurking away to be repaired. I think it's a fair call: If I go for him I am committed to feat and there's no secondary damage really. I want to ensure that Amon can't start the attrition game under my feat so the plan is to disrupt and knock down both Crusaders on my right. This all works out and the Indictor dies, however...


The crazy charge ranges allow my opponent to put 2 Dervishes into Stryker following side step. We run the numbers in Odds Machine. Luckily it's in my favour so instead we just play on. I could -and should- have blocked this off by having the Stormwalls closer together.


The Protectorate forces simply consolidate their positions instead.


I realize that having Chargers on my right flank isn't really helping me out all that much. The two Dervishes there are a pain however. I try and go for a play where I slam the both of them out of the zone. In hindsight it's not the best play: I should try and just kill these asap with hammer attacks so I can help out the central grind instead. Furthermore, with the Chargers tied up on my flank for multiple turns Amon can play a lot more aggressively. I do take out some things in the middle with the 'walls, but I sorely miss Snipe on Stryker to land Disruption shots where needed. Note to self: In this particular matchup that is something I definitely should have.


Amon feats and takes down a 'wall.


Scenario is becoming an issue and I just don't have that many pieces left to grind with in the center. I've spent too much time doing too little on the right flank. The game isn't over yet however, time is running dangerously low as the grind is -really- drawing out and I could still clear stuff up. I needed a pod to roll 12+ this time however to disrupt the Crusader near the 'wall. That luckily happens and we have a game still!


Amon tries to put more hurt on the 'wall but it's negligible.


Amon's up to 3CP. I'm out of pods. I have to position the 'wall so that it can contest next turn if need be. I also need to try and kill the Crusader with Fortify who's only taken marginal damage thus far. Unfortunately this fails...


However Amon has a little over a minute to kill the contesting Charger and my objective. He fails to do so and I win on the clock!

Victory to the Swans!

:: Evaluation ::

The initial Indictor play seems really bad, but in reality it sets up for a very nice piece trade for Protectorate. I get my feat off early and I don't score any points. On the right flank I committed to many models which got too little work done. This bogged me down and ensured the central fight was really, really hard mid-game. Discovering that Snipe on Stryker would be awesome is also an important little thing in this matchup.

The grind feels very even, like it can turn both ways. It certainly is tricky! On scenario however I feel like Amon might have the upper hand. Sure, pods are amazing but it's virtually impossible to block him out from contesting and he never runs out of models.

A very interesting test! I was ready for a rematch to learn more about the nature of these two up against each other.